This article refers to releases and features. Depending on your workspace type, you may see "schedules" and “activities" in your workspace.
This article is part of a series of settings overview articles:
Account | Workspace | Integrations | Personal |
Aha! Roadmaps | Workspace settings
Workspace-level settings affect a particular workspace or workspace line in your Aha! account. This article will explain each workspace setting in the Workspace: <your workspace> section.
Open your workspace settings by navigating to Settings ⚙️ Workspace.
Click any of the links below to skip ahead:
Workspace settings report
Workspace settings
Aha! Develop
Report on your workspace settings
For a comprehensive view of the workspace settings across your Aha! account, click the View report link at the top of your workspace settings.
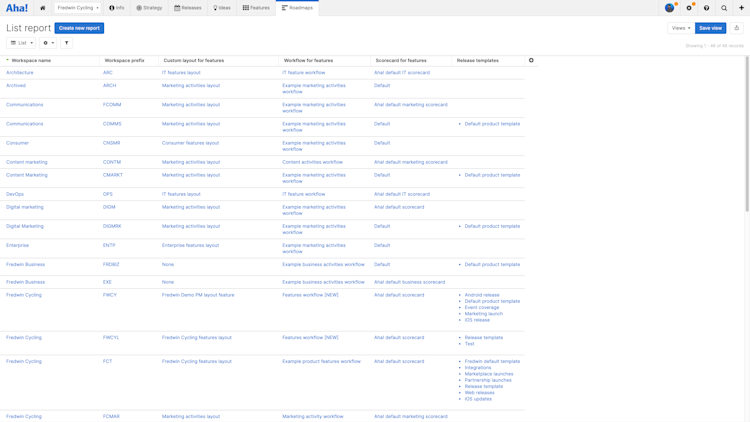
This report will show you the settings for every workspace and workspace line in your account that you have access to.
Use the report to view your workspace settings all on one page so you can compare them at a glance and adjust them easily.
For the rest of this article, we will look through the individual settings one at a time.
Configure
First, let's work through the Configure settings. If you navigate to Settings ⚙️ Workspace while in a workspace line, the Configure settings will be the only section available.
The workspace profile settings affect a workspace's workflows, layouts, and scorecards.
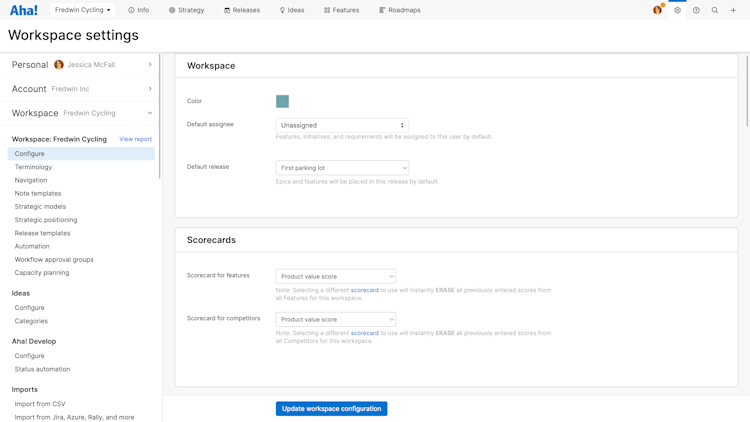
The Color setting configures the color for your workspace, which you can see in Roadmaps Portfolio. Use a hex color code to enter a custom color.
The Default assignee setting determines who Aha! features and requirements will be initially assigned to. This can be any user in your account or you can have these records remain unassigned by default.
The Default release setting determines which release new epics or features added to your workspace will be added to automatically:
First parking lot will add new epics and features to the first release in your parking lot.
First release will add new epics and features to the first release on your Features board.
Specific parking lot offers the option to select a specific release you have already added to your workspace's parking lot.
The Scorecard for features setting determines the scorecard available for your features. Aha! includes a default scorecard but you can substitute it for a custom scorecard if you choose. Anytime you change the default scorecard here, you will erase all previously entered scores for all features in your workspace.
Like the Scorecard for features, the Scorecard for competitors determines the scorecard available for your competitor profiles. You can score your competitors in Strategy Competitors Chart view by dragging them around the 2x2 competitor matrix. You can also score by clicking on a competitor then clicking on the Threat scorecard field.
Workflow
The next settings section affects the workflows for various record types in your workspace. You can choose to inherit workflows from higher levels of the workspace hierarchy for consistency or you can create new workflows for your workspace's unique needs.
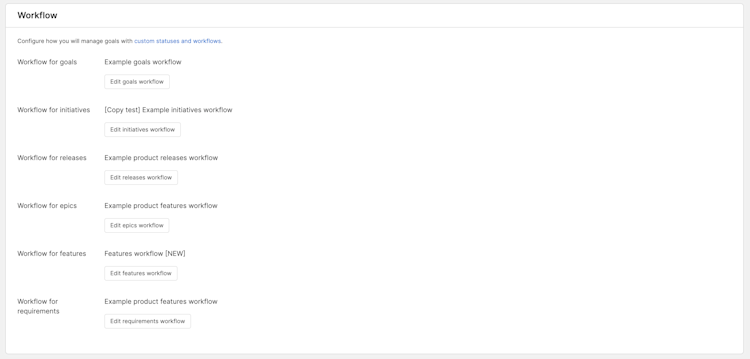
In this section, you can change the workflow for the six basic record types:
Goals
Initiatives
Releases / Schedules
Epics
Features / Activities
Requirements
For each record type, the process to adjust a workflow is the same. Click Edit <record type> workflow to open the Change workflow modal. From here, you can change the workflow using the New workflow dropdown or map the statuses in your current workflow to new statuses using the New statuses dropdown. If you are adjusting the workflow for an epic, feature, or requirement, you can also map the record types from your current workflow to new types using the New types dropdown.
Click Update <record type> statuses to save your changes. Any changes you save take effect immediately across every relevant record in your workspace.
Click the Custom statuses and workflows hyperlink next to each record type to navigate to Settings ⚙️ Account Configure statuses and workflows. From here, you can create, edit, or delete the workflows that you want to apply to your workspace. You will need to be an administrator with customization permissions to access this part of Settings ⚙️ Account.
Workflow syncing
Ambitious work gets completed one step at a time — feature by feature, requirement by requirement. You can already calculate an epic's or a feature's progress from its child records, but you might also want epic and feature statuses to update as contributing records progress through their workflow.
With these settings enabled, parent records' statuses will stay in sync with their child records' status categories — so for example, once a feature moves to a status in the In progress category, the epic's status will change to the first status in its In progress category.
A few things to note about workflow syncing:
You can always manually change the status of any record.
The parent record's status will change once the first child record's status advances to a new status in the workflow.
The workflow sync follows your records through the workflow from Not started to Shipped or Will not do. It will not stay in sync if you move backwards in the workflow.
Workflow sync works with automation. However, if you use automation on the child record and the parent record has a fixed workflow, the statuses will not remain synced if syncing would cause the parent record to skip a step in its workflow.
If you have synced requirements and features, and features and epics, it is possible for a requirement's status change to update a feature's status, which then updates an epic.
To adjust these settings, use the appropriate dropdowns:
Epics: Choose whether an epic's status should automatically update when its features update.
Features: Choose whether a feature's status should automatically update when its requirements update.
Epic workflow syncing is disabled by default for Aha! Roadmaps workspaces created before March 24, 2021, and enabled by default for workspaces created after that date. If you want to see your workflow syncing settings for each workspace across your account, use the workspace settings report.
Custom layouts
The Custom layouts section helps you adjust the way that fields are laid out on records in your workspace.
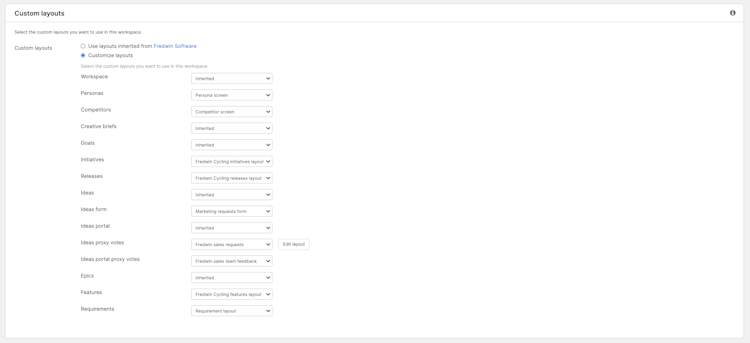
To create, edit, or delete a custom layout, you will need to be an administrator with customization permissions (navigate to Settings ⚙️ Account Custom layouts to do this), but workspace owners can select which layouts get applied to the record types in their workspace.
You can choose to Inherit record layouts from the next level up in your workspace hierarchy. You can also work through each of the available record types and decide one-by-one whether you would like to inherit or select your own custom layouts.
Goals
Initiatives
Releases / Schedules
Epics
Features / Activities
Requirements
Workspaces
Ideas
Personas
Competitors
Creative briefs
Organizations
Proxy votes
Ideas portal — Ideas
Ideas — Proxy votes
For each record type, use the custom layout dropdown to select the layout you want the record to display in your current workspace. If you want to edit the custom layout you have selected (and you have the proper user permissions), hover over a record type and click Edit layout.
Epics
Not every team chooses to use epics, so the Epics workspace setting allows you to choose whether you would like to Enable, Disable, or Inherit your epic settings from the next level up in the workspace hierarchy.

Objectives and key results (Enterprise+)
If your team uses the objectives and key results (OKRs) framework, you can enable that here. The three options are:
Inherit from workspace line: Useful if you want to align an entire product line around OKRs.
Disabled for your workspace or workspace line.
Enabled for your workspace or workspace line.
When enabled, your workspace will change:
Goals will be renamed as "Objectives."
Each objective will have a new Key results tab, where you can add as many key results as you need.
Click Update workspace configuration to save your changes.
Card customizations
Some pages in Aha! Roadmaps display records as cards — the features board and feature workflow pages, for example. You can customize the fields those cards display to highlight the information most important to your workspace.

The changes you make to these workspace-level settings will set a default card layout. Individual users in your workspace can also customize card layouts on individual pages, which will change the card layout for just those users.
To drive consistency across workspaces, you can choose to Use card layouts inherited from your workspace's parent workspace line.
If you would rather customize the card layouts for your workspace, select Customize card layouts and click Customize cards. The Customize record cards modal will appear with tabs for each record type that can appear as a card in your team.
The record tabs available are:
Initiatives
Releases / Schedules
Release phases / Schedule phases
Epics
Features / Activities
Requirements
To-dos
Click on a tab to open that record type's card layout.
Click the View buttons on the right to see how the card will display in an Expanded view, Collapsed view, or Whiteboard view.
Click the gear dropdown ⚙️ for further customizations:
For features and requirements, click the toggle to show or hide the record's Parent record on the card.
Choose whether you want the card to Show card images. The card's image will be an image of the first attachment on the card.
Choose whether the Card highlight should highlight the record's status in the Background or just the Sidebar (leaving the background white).
Then customize the card layout:
Select the fields you want to add to the card layout. If you have a lot of available fields, use the Search at the top of the tab to find the one you need. You can also collapse Standard fields or Custom fields to show only one type of field.
Drag and drop fields onto a card to add them. Click the X beside a field to remove it.
You can drop fields next to others on the same row or beneath the bottom row of fields to create a new row on the layout.
Add a Divider line anywhere on the card layout to better organize key data.
Click Reset to default to revert your changes to the default layout, Cancel to exit the modal or Save to save your work.
Work requests (Enterprise+)
If you are an Enterprise+ customer, you also have access to work requests. Work requests are enabled at the account level, but you can further configure them here in your workspace settings.

By default, anyone with owner or contributor user permissions to your workspace can respond to work requests. If you want to limit that list of people, you have two options:
Create a custom user permissions role and select that option in the Enhanced security setting.
Add particular users to this workspace-level setting. The users you add to this list will be the only ones able to respond to work requests for this workspace.
Progress calculation
You can track a record's progress by several different methods. To drive consistency across your team, you can set the default progress calculation, per record type, here at the workspace or workspace line level.
You can set the default progress calculation for the following record types:
Goals
Initiatives
Releases / Schedules
Release phases / Schedule phases
Epics
Features / Activities
By default, the progress calculation for each record will be inherited from the workspace line level, so that every workspace in the workspace line calculates progress in the same way.
There are two items to note about inheriting progress calculations from a workspace line:
Some progress calculation methods depend on settings that need to be enabled first. Initiatives, for example, can calculate their progress from linked epics — but epics first need to be enabled at either a workspace or a workspace line and inherited to a workspace. Likewise, features can calculate their progress from a remaining estimate, but that requires capacity planning for individuals in a workspace. If you choose to calculate progress from epics or estimates at the workspace line level, and a child workspace does not have those settings enabled, progress calculation methods for those settings will default to Enter manually.
At the workspace line level, goals and initiatives can calculate their progress from child goals and from child initiatives. If you select this progress calculation at the workspace line level, workspaces will default to Enter manually — since a workspace cannot have child workspaces.
These settings control records' default progress calculation. Users in your account can always change individual records' progress calculations to other methods.
Record dates
In the Record dates settings, you can choose how parent record types should calculate their Start and End dates. Either enter those dates manually, or calculate them from child records. If calculated, then any time a child record's dates change in a way that would affect the parent's dates, the parent's dates update.
Users in your account can always change the way that parent dates are calculated, but these defaults help drive consistency.
Note:
Defaults affect newly created records. They do not update the dates for existing records.
If an integration updates a record's Start date or End date, the calculation type will change back to Enter manually, and updates to child records that you make in Aha! will not update the parent record.

Document access
All users with reviewer permissions for a workspace can access that workspace's notes and whiteboards. Here, you can configure whether reviewers can also edit workspace notes and whiteboards. Select View if you only want reviewers to be able to view documents, or select Edit to allow reviewers to edit workspace documents as well. Click Update workspace configuration to save your changes.

Once your changes are saved, document access settings will be applied to all documents in your workspace. You can change access settings for reviewers on individual documents without changing them for all users. To change reviewer access on a single document, access its Share menu and use the dropdown next to Reviewers to select Edit or View.
Terminology
Your team will work best in Aha! Roadmaps if they can work with language that they are used to. Instead of releases, for example, your team might have multiple ongoing projects, or perhaps your features are called stories.
The Terminology setting section allows you to customize the names of Aha! record types in your workspace — or inherit a standard terminology from higher levels of your workspace hierarchy.
Select the radio button next to Use default terminology if you would like to retain the default terminology for your workspace type.
Select the radio button next to Customize terminology if you would like to customize terminology used in your workspace's navigation or if you would like to customize the terminology used for records.
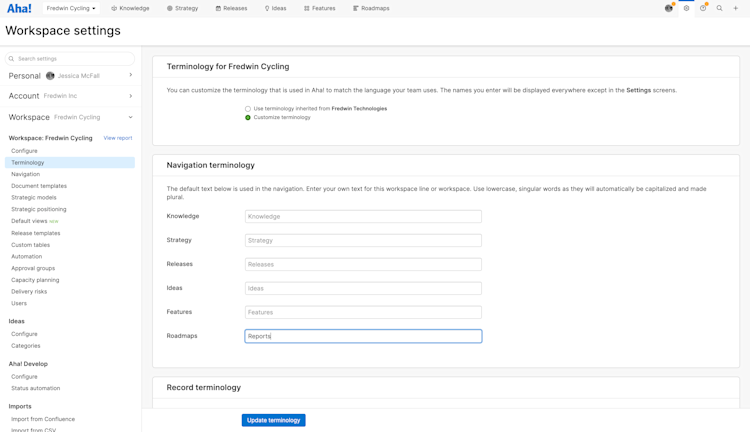
To customize your terminology:
In the Navigation terminology section, enter your preferred terminology for the navigation items you want to change in your workspace. Any fields left empty will use default terminology.
In the Record terminology section, enter your preferred terminology for each record type you want to change in your workspace. Terminology you enter for records will be displayed everywhere in the workspace except the Settings pages.
Click Update terminology to save your changes.
If you choose to customize the terminology for a workspace, Aha! will display your customized term in any place that it refers specifically to that workspace. Aha! will still use the term “workspace” when referring to the general concept of a workspace or to a group of workspaces. If you are customizing the terminology for a workspace line, each workspace in that workspace line will inherit that same terminology. You can always customize each workspace individually if you need to.
Navigation
In addition to customizing your terminology, you can also customize the navigation buttons at the top of your Aha! page for each workspace.
You can navigate to these settings through Settings ⚙️ Workspace Navigation, or by hovering over your navigation bar and clicking the pencil icon that appears.
Select Use navigation inherited from <workspace> to inherit your workspace navigation from a higher level of the workspace hierarchy.
Select Customize navigation to choose what pages are shown or hidden in your workspace. Click Update to save your changes. The navigation that you choose will be presented to all users in your workspace.
By default, the Ideas section is disabled. The Ideas section is automatically enabled when you create an ideas portal in your workspace.
Document templates
Document templates provide a ready-to-use format for the types of documents you create most. Aha! Roadmaps offers a library of templates to choose from when you create a new document. If you have specific details pertinent to your team that you want to include in a template, create a custom note or whiteboard template in workspace settings. Shared document templates can be inherited from a workspace line, so you can drive consistency across teams and establish a standard approach for capturing information.
If you want to share a template across multiple teams, we recommend creating it at the highest level in your hierarchy so that it can be inherited by any workspace lines and workspaces within it. You must be a workspace owner to add a document template.
From the Document templates section, click Add document templates. Then select Note, Whiteboard, or Meeting. Customize the template to your needs — add custom fields, add tables, images, Aha! views, and more. You can also assign watchers, add to-dos, and change the title icon to an emoji to help your template stand out.
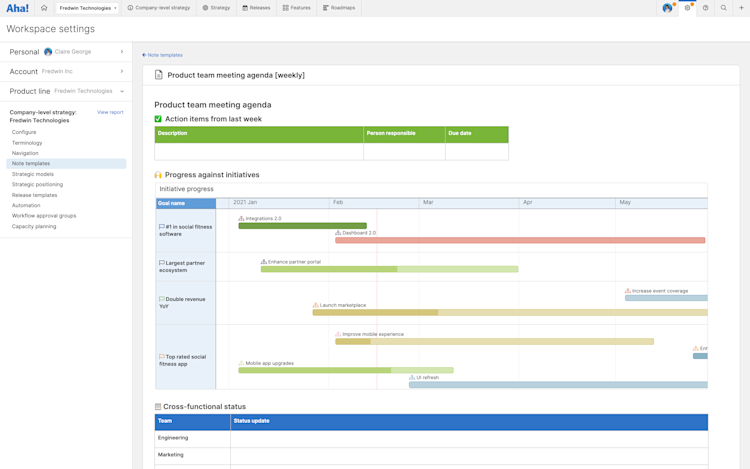
After templates have been created, you can hover over them to view the actions available, including View, Edit, or Delete. You will also see any note templates that were created at a higher workspace line. If you have permission to access that workspace line, you will be able to edit the note template created there. Click View to navigate to that workspace line's Document templates settings.
When you are ready to use a note template you have created, you will find it in the Workspace section of your template library.
Strategic models
Strategic models help you define and focus your strategy. In Strategy Models, you can select from a variety of example models or you can create a strategic model template for your team's use.

Click Add template to create a new template. The Add template modal will appear.
The Template name field lets you name your template.
The Start from field allows you to build your template from scratch or use one of the example templates as a foundation.
The Category name field maps to the Model type filter back on the Strategy Models page. If you have a lot of models in your account, the Model type filter allows you to sort through them.
The Permissions field shows you where in your workspace hierarchy your template will be available. If you create a template at the workspace line level, you can choose whether the template will be available to child workspaces under that line.
Click the Add template button to create the template, then adjust the template by adding, editing, rearranging, or deleting components. Any changes you make will be reflected immediately on the Strategy Models page.
Navigate to Strategy Models to use your template.
Strategic positioning
While strategic models help you define your strategy, strategic positioning helps you articulate the problems or opportunities that your product, program or service solves.

For consistency's sake, it can be helpful to create a positioning template for your team. The Strategic positioning settings help you do this.
Click Add template to create a new template. From the Add template modal, you can name the template, create it from scratch or with one of our examples, categorize it, and then decide how it is shared.
Templates created at the workspace line levels in Aha! can be shared across all workspaces under that workspace line. Templates created at the workspace level are only available within that specific workspace.
Once you have created your template, you can access it by clicking Add positioning then Shared templates on the Strategy Positioning page.
Default views
Create standard views of the reports and roadmaps. Then set them as the default views in your workspace or workspace line. If you set default views at a parent line level, each child workspace can inherit them.

You can create default views for the following pages in Aha! Roadmaps:
Releases
Ideas
Features
Roadmaps
Analytics
To set a default view, Save one of the pages above. Then navigate to Settings ⚙️ Workspace Default views.
Click the correct tab to find the page you want to set a default for. If you have not already set a default for a page, it will show the default that comes with your Aha! account.
Click Edit by the default view you want to customize.
The Set default view modal will open, already filtered to saved views of your selected view type.
Search for, then select the view you saved earlier. Click Set default view to save your selection.
You can also adjust a default view at any time:
To edit your default view, make changes to your saved view and Save them again.
To remove your custom default, click the More options menu next to a customized default view and click Reset.
A user will see your default view if they do not already have a working copy of a view on that page, or if they click Views Reset to default view.
If you plan on using default views across workspaces, make sure that workspace statuses are consistent so that the default view shows useful information for everyone. The workspace settings report can help you align statuses across workspaces.
Release templates
The Release templates settings are where you create, edit, copy, and delete release templates for your workspace. We will discuss release template settings in that order.
Create a release template
Think of releases as containers for work. Together, you and your team are working towards a single date, called the release date, when your project will be complete.
Release templates infuse releases with a consistent structure. This is particularly useful if your team has repeating types of work, such as a weekly go-to-market launch or monthly updates to your iOS app.
Most teams create release templates at the workspace line level, not the workspace level. This is because if you create a release template on a workspace line, it will be available to all child workspaces under that line.
To create a new release template, click Add release template.
Click Example [workspace type] template to start with a release template built around your workspace type. Look at the Template preview for context — you can always change these phases and durations for your own release template.
Click an existing release template to build off its details. Again, the Template preview will give you context.
Click on No phases to build a release template completely from scratch.
Click Create template to create your template.
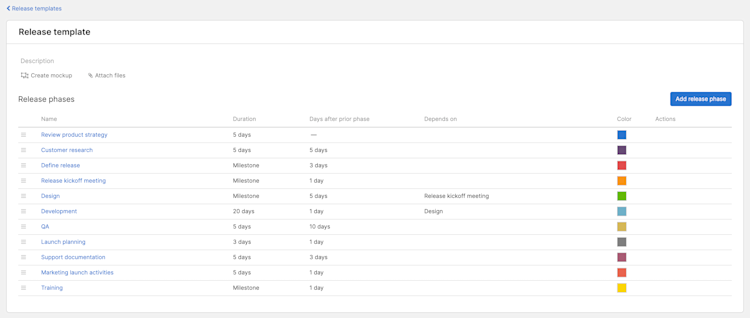
When creating or editing a release template, you can edit the template's Name and Description, attach any relevant assets, click Add release phase button to add a release phase, drag an existing phase vertically to re-order it, and hover over an existing release phase to Edit or Delete it.
Release phases come in two types: phases and milestones. Milestones are single important dates to your project — such as the date that design is completed, or the date that the app store approves your mobile application. Phases are containers of work within your release — you may have design, development, and test phases, for example. Both types of release phase are optional. Use this template to design a workflow that best helps your team.
When adding phases and milestones, you will be presented with a few options:
Name: The name of the phase or milestone.
Default description: The description that appears when accessing the phase or milestone details.
Type: Select if this is a phase or a milestone. Remember, a phase represents a range of time with a start and end date, while a milestone represents one specific date.
Days after prior phase: Allows you to stagger your phases and milestones. The number of days you select ignores weekends. Use a negative value here to define phase or milestone overlap in your template.
Depends on: Use this to create dependencies between different phases.
Default duration: The default duration allows you to specify how long each phase is. This is not applicable to milestones since milestones are a single specific date.
Color: Allows you to specify the color of the phase or milestone when visualized on roadmaps.
To-dos: Allows the creation of to-dos as part of the template. Template to-dos can have a summary, description, and assignee. They cannot have pre-defined dates.
Once you have edited the release phase, click Add to template for a new phase, or Save for an existing phase. Click the Release templates link in the upper left corner to return to your list of release templates.
Edit a release template
To edit a release template, hover over it and click Edit. From the release template details, you can add, edit, or delete template details following the same functionality listed above.
In the list of existing release templates, you will see any release templates that were created at a higher workspace line.
If you have permissions to access that workspace line, you will be able to edit the release template created there. Click View to navigate to that workspace line's Release template settings.
If you do not have permissions to access that workspace line, you can always Copy the template you want to edit, and change it to suit your team's needs. You can even click Make default to create a new default release template for your workspace.
Copy a release template
To copy a release template, hover over it and click Copy. You will be taken to a copy of your template, with [Copy] prepended to its name. From here, adjust the template as you need to.
Set a default template
When users in your workspace create a new release, they can select from a list of Release phase templates.The default template you select will be the preselected release template in that list. Users can still select a different template.
Note:
If you delete the default template or no template is set as a default, the preselected option will be the first alphabetical template.
Your default release template will apply to newly created releases. It will not adjust existing releases automatically. To apply a new release template to an existing release, open the release's drawer or detail view, click More options, then select Apply new release phase template. From there, choose whether to Add your release template to existing phases, or Delete and replace existing.
Delete a release template
To delete a release template, hover over it and select Delete.
Note: You cannot delete a release template while it is the default template. Select another default first, then delete it.
Custom tables (Enterprise+)
Enterprise+ users have access to custom tables. Use custom tables to extend the Aha! Roadmaps data model to include the information most pertinent to your team's strategic decisions. You can link custom tables to Aha! records with custom fields, and build sophisticated calculations with them using custom worksheets.
Viewers, reviewers, and contributors in Aha! Roadmaps can access only the Users and Custom tables pages in workspace settings. They are not able to see or change any other workspace settings.
Click the + to add a new custom table.
Click a tab to switch between multiple custom tables.
Click Add record to add a custom table to a record.
You can also import custom table records by CSV.
On the right side of the page, click the More options menu to view the custom table as a list report.
Automation (Enterprise+)
If you are an Enterprise+ customer, you can create automation rules in your workspace to streamline your work, drive consistency across your team's workflow, and free you up to focus on more complex projects.
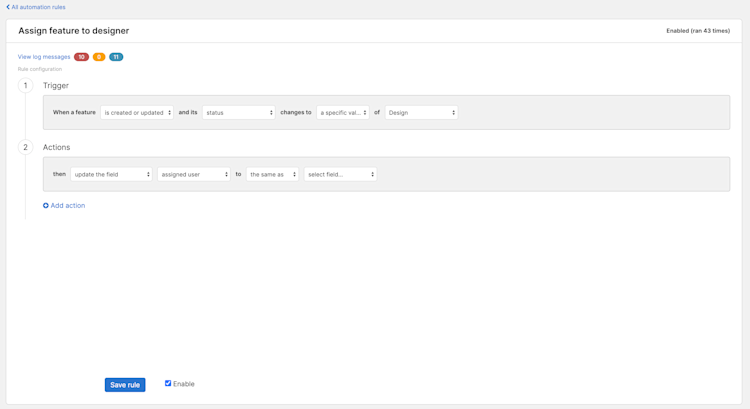
Automation rules have three parts: triggers, conditions, and actions. Each rule starts with a trigger. If the trigger happens and all the conditions are met, then the actions you define will run automatically.
You can use automation rules to sync statuses across related record types (like ideas and promoted features), to notify Aha! users when certain fields are updated, or to create standardized to-dos when a record reaches a certain stage in its workflow.
Read this article for more information on automation rules.
Workflow approval groups
Workflow approval groups are groups of Aha! users that approve or reject approval to-dos in a fixed custom workflow. You will use them in four different areas in your Aha! account:
Create the workflow approval group at the account level. Choose a name that defines the group, such as Legal, or Finance.
Populate the workflow approval group at the workspace line level. If you add users to a group at this level, child workspaces can inherit the group's users.
Customize the workflow approval group users at the workspace level. If you add group users at this level, they will replace any inherited users.

Read this article for more information on workflow approvals.
Capacity planning
Capacity planning is the process of estimating the amount of effort it will take to achieve your strategic goals and comparing it to the people, time, and finances available to you.
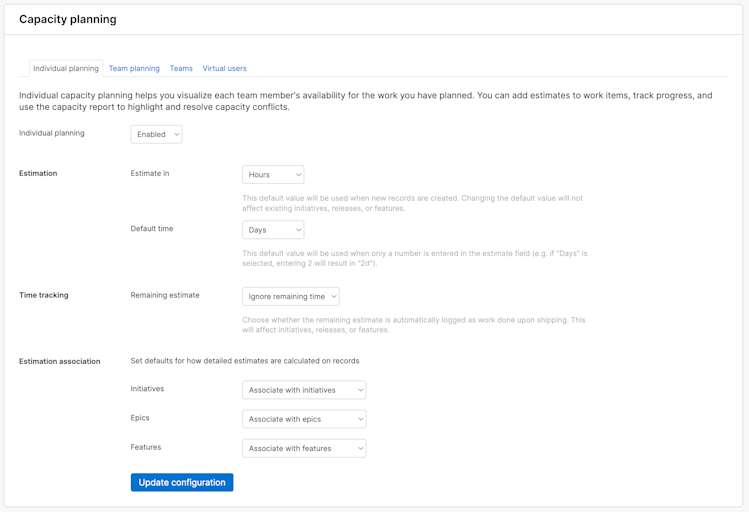
Individual capacity planning, available to all Aha! customers, helps you visualize the effect of your team members' available time on the work you have planned. You can add estimates to work items, track completion progress manually or through an integrated development tool, and use the capacity report to highlight and resolve capacity conflicts before they affect your team's velocity.
Team capacity planning, available for Enterprise+ customers, helps you visualize your teams' and team members' workload and resolve any capacity conflicts before they happen. You can estimate effort for multiple planning scenarios, detail the work schedules of your individual teams, and use the capacity report to visualize a version of how your plan might play out across your teams, in either the hours or the people necessary to complete the work.
Administrators in your account may wish to create a custom role for capacity planning for teams, so that only users included in the custom role will have the ability to view or adjust advanced estimates.
The Individual planning tab includes settings for individual capacity planning, which is enabled workspace-by-workspace. Here, you can select the units you would like to Estimate in, how to treat any estimates remaining after a work item has been completed, and whether to associate an estimate with initiatives, epics, features, or requirements.
The Team planning tab includes settings for team capacity planning, which is enabled at the account level, then enabled and configured further in each workspace. Here, choose which record type(s) you would like to enable for capacity planning for teams.
Note: Unless you are an Enterprise+ customer and capacity planning for teams has been enabled at the account-level at Settings ⚙️ Account Capacity planning, you will not see the Team planning, Teams, or Virtual users tabs.
The Teams tab is where you create teams unique to your workspace, as well as view teams that you have inherited from a workspace line or from the account.
The Virtual users tab is where you create virtual users unique to your workspace, as well as view virtual users that you have inherited from a workspace line or from the account.
Delivery risks
Delivery risks give your team an early warning when your plan is at risk. Here, you can choose the types of risks you want to track automatically, and whether you want to allow your team members to add custom risk indicators manually.
Enabled: Toggle these risk indicators on or off.
Allow users to flag records: Click this toggle to enable users in your workspace to flag at-risk work themselves. They can flag any epic, feature, or requirement in your workspace, and add a comment explaining the risk.
Planning
These risks typically apply to the planning stage of product development, which can take place in both Aha! Roadmaps and Aha! Develop. Enable as many of these as are useful to your Aha! Roadmaps workspace.
The risk alerts you enable here will apply to any records created in your Aha! Roadmaps workspace. Records created in Aha! Develop will show alerts from the Aha! Develop team where they were created.
Work not scheduled
Work due soon: Select a number of days to define what "soon" means to your team.
Work overdue: Select a number of days to define what "overdue" means to your team.
Release due soon: Select a number of days to define what "soon" means to your team.
Release overdue: Select a number of days to define what "overdue" means to your team.
Development
These risks typically apply to the development stage of product development, which usually takes place in Aha! Develop. Enable as many of these as are useful to your Aha! Roadmaps workspace.
Development risk alerts are not mappable over integrations, and with few exceptions third-party integrations cannot affect Aha! risk alerts. You will need to have Aha! Develop enabled in your Aha! account to see these risk alerts on your Aha! records.
No team
No detailed estimate: Records in your Aha! account can have two types of effort estimates. Initial estimates come early in the prioritization process when the work is largely undefined. Detailed estimates come after the work has been scoped and vetted by experts (often including input from an Aha! Develop team).
No assignee
No sprint: This risk alert is most useful to Aha! Develop teams that use sprints.
No program increment: Work has not been assigned to a SAFe program increment.
Started late: Select a number of days to define what "late" means to your team.
Status churn: This risk indicator triggers if a record keeps returning to a previous status instead of progressing through development. Select the number of cyclical status changes that should indicate a record is stuck.
Work stalled: Select a number of days to define how long a record type can stay in a single In progress workflow status before you would consider progress stalled.
Dependencies not started
Dependencies past due: Select a number of days to define what "past due" means to your team.
Sprint rollover: Work have moved from sprint to sprint without being completed. Select the number of sprint changes that should trigger this alert.
Click Update configuration to save your changes.
Users
The Users page allows you to manage users in your Aha! Roadmaps workspace. If you have owner permissions, you can remove and change permissions for users. If you are an administrator with billing permissions, you can delete users and manage them at an account level at Settings ⚙️ Account Users.
Viewers, reviewers, and contributors in Aha! Roadmaps can access only the Users and Custom tables pages in workspace settings. They are not able to see or change any other workspace settings.
You can also add users to your account from this page, if one of the following scenarios is true:
You are an administrator with billing permissions.
You are a workspace owner for your current workspace, and your Aha! Roadmaps account does not have paid seat groups enabled.
You are a workspace owner for your current workspace, your Aha! Roadmaps account does have paid seat groups enabled, you are an owner for a paid seat group, and your paid seat group has a seat available.
On the Users page:
Click the user's name to Edit their permissions.
Check or uncheck the Send box by in the Weekly summary email column to adjust the user's weekly summary email notifications.
Mouse-hover over a user's row and click Remove user from workspace in the Actions column to remove the user from your workspace. Remember, only administrators can remove the user from your account.
Configure (Develop Advanced plan)
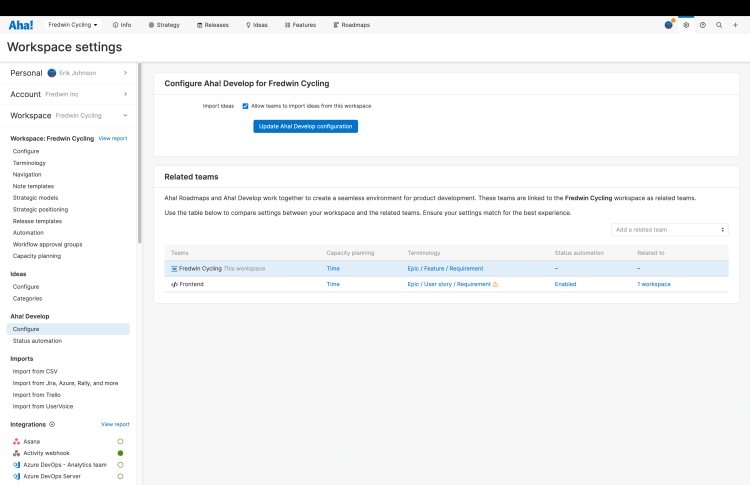
If you have integrated your Aha! Roadmaps account with Aha! Develop, you can configure the integration with these settings.
First, you can import reported issues from an ideas portal in Aha! Roadmaps directly into Aha! Develop to streamline service requests. To do this, you first need to configure an Aha! Roadmaps workspace to allow Aha! Develop teams to import ideas from portals associated with that workspace.
Import ideas: Check this box to allow Aha! Develop teams to import ideas from your workspace.
Click Update Aha! Develop configuration when you are done.
Second, you can associate your Aha! Roadmaps workspace with an Aha! Develop team (or many teams). When you do, you can compare the settings that will most affect your collaboration.
Add a related team: Choose an Aha! Develop team to associate with your workspace. When you do, you will see a comparative view of your Capacity planning and Terminology settings, and whether you have automated workflow statuses.
Click on any setting to adjust it. To adjust an Aha! Develop team's status, you must have owner permissions to that team.
Click More options, then Remove mapping to undo your workspace's association with that team.
Status automation (Develop Advanced plan)
If you have integrated your Aha! Roadmaps account with Aha! Develop, you can automatically update record statuses in Aha! Roadmaps as engineering work progresses. Integrated accounts share records (epics, features, and requirements) so product and engineering teams can focus on the same work items. But since product and engineering teams have unique workflows, there are two statuses on each in integrated accounts — one for product teams and one for engineering.
Sometimes the product workflow relies on engineering status updates — a PM review cannot start until the engineering team has completed development, for example. Instead of relying on manual status updates, you can map Aha! Develop team statuses to your Aha! Roadmaps workflow. This way, changes to a record's status in Aha! Develop would automatically update that record's status in Aha! Roadmaps.
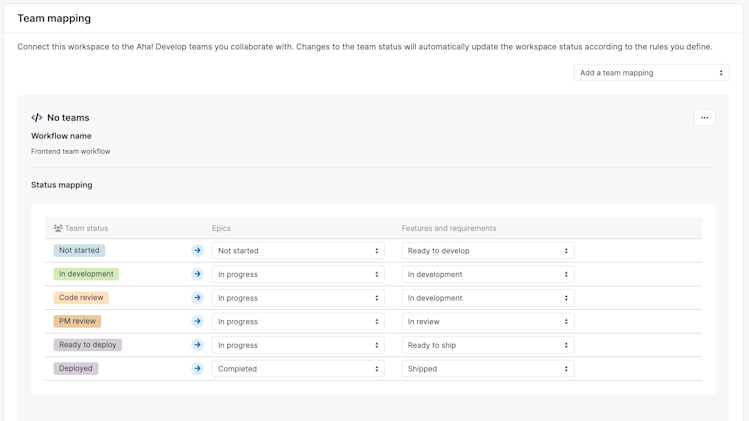
Team status mapping flows one way, from engineering to product. Changes to the Aha! Develop team status trigger updates to the Aha! Roadmaps workspace status.
To do this, you need to be a workspace owner in the Aha! Roadmaps workspace where you want to add the status mappings and have at least viewer permissions to the Aha! Develop team(s) you want to map to your workspace.
If your workspace is not yet connected to any Aha! Develop teams, select a team first. Then you will see the Aha! Develop team's workflow statuses on the left of a card. Under the Epics, Features, or Requirements columns, click on any status dropdown to map the Aha! Develop team status to your Aha! Roadmaps workflow status for that record type.
Note: If you do not see an option to map epic statuses, make sure you have enabled epics in your workspace.
For example, you may want to focus on features. So you map the Aha! Develop team status "Ready for review" to the Aha! Roadmaps workflow status "In PM review." This mapping means that any time an Aha! Develop feature moves to the "Ready to review" status, the Aha! Roadmaps status on that feature will change to "In PM review" and your team will know they have work to do.
Note: Team status mappings pair very well with automation rules — particularly the ability to dynamically assign users. Once a feature enters "In PM Review," for example, you can trigger an automation to assign the correct product manager a to-do to review the feature.
Click Update team mappings to save your work. You can repeat this process with as many Aha! Develop teams as you like.


