To avoid redundant third-party notifications, changes to the text editor are delayed by at least five minutes, waiting for five minutes after the most recent change.
Aha! Roadmaps | Detailed Jira integration instructions
Successful products do not happen by accident. They are often the result of seamless collaboration between product and development teams. Developers need strategic context for their work. Product managers need progress updates to inform their roadmap.
But all too often, product managers have to use developer tools just to provide context and track updates — then manually update their own product plans elsewhere. They spend their days in multiple tools, trying to bring strategic vision and successful go-to-markets together.
The integration between Aha! Roadmaps and Jira keeps product and development teams in their tools of choice — without sacrificing context or collaboration. Two-way updates mean that strategic and progress updates flow back and forth in real time. And you can customize the integration to match your team's workflow and terminology.
If this is your first time setting up a Jira integration, use this article for an overview and quick set up.
Click any of the following links to skip ahead:
Prerequisites
Integration type |
|
Supported versions |
|
Aha! Roadmaps level |
|
Required user permissions: Configuration | |
Required user permissions: Use integration | |
Associated record types |
|
How to think about the integration
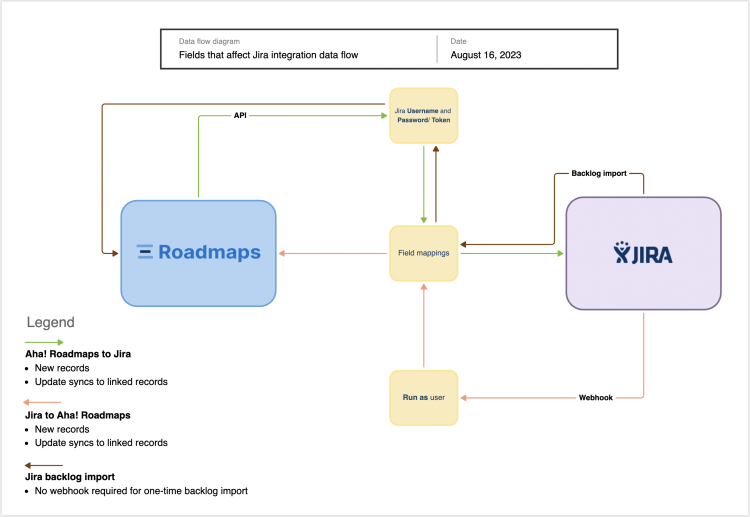
The Aha! Roadmaps Jira integration is two-way, which means information can be updated in either tool. Send your planned work to Jira, get notified when the Jira issue's status updates, and use comments to keep each team up to date.
Before configuring any integration for the first time, it is important to fully understand how to think about integrating Aha! Roadmaps with your development tool. Aha! Roadmaps should come first in the process —build out or import your records in Aha! Roadmaps, then send them to Jira. You can customize the ways that fields map to each other between the two tools, and even customize whether you want integrated records to update automatically, or only after your review.
This integration supports sending the following Aha! Roadmaps records to Jira:
Initiatives
Releases / Schedules
Epics
Features / Activities
Requirements
Configure the integration
To set up an integration with Jira, you need to be a workspace owner in Aha! Roadmaps for the workspace you wish to integrate. You will also need to have a Jira account with proper access to create and edit records in Jira for the project you plan to integrate with.
If you need to connect to multiple Jira servers or Jira Cloud accounts, please reach out to the Product Success team at support@aha.io. We need to toggle a back-end setting to enable this to work smoothly. If you create a Jira integration that connects to multiple Jira servers or accounts without this setting enabled, you may see data mis-matched (e.g. a comment on a linked record appearing on another linked record in a different workspace).
In addition to company managed projects, this integration also works for Jira team-managed projects. If your organization uses Jira Advanced Roadmaps (formerly known as Jira Portfolio), you can include Jira initiatives in your integration mappings as well.
This support article refers to the 2.0 version of the Aha! Roadmaps integration with Jira. For the 1.0 version, see Integrate with Jira cloud & on-premise (integrations 1.0).
Ready? Let's get started!
Navigate to Settings ⚙️ Workspace, and then click the + icon next to Integrations in the left navigation bar.
Choose Jira in the Integrations 2.0 grouping.
Enter a name in the Integration name field, and then click Save and continue. You should name your integration with a unique identifier based on the configuration settings you make — especially if you plan to have multiple Jira integrations for a single Aha! Roadmaps workspace.
To standardize your integration configuration across all Jira integrations in your Aha! account, consider using a template.
When you send records from an Aha! workspace to a Jira project, your Aha! account will send any linked records in other workspaces that share the same integration template — and those records will be linked in Jira as well. For example, you may have a feature in a workspace that is linked to a higher-level initiative in a in a different workspace. If both workspaces use the same Jira integration template, then sending the feature to Jira also creates the initiative in Jira as a record linked to the feature.
On the Configure Account tab, enter the following information, and then click Save and continue.
Server URL: Make sure you enter the URL used to access Jira without a trailing slash, e.g. https://fredwin.atlassian.net.
Username and Password: You need to configure a Jira user for this integration.
If you are using Jira Cloud, you will add a Jira user's email address and that user will need to create an API token in Jira to use as your password. If they do not use an API token, the integration will break with a 403 error.
If you are using an on-premises installation of Jira, we recommend entering a username and generating a personal access token to authenticate. You can also use a username and password.
Password type: Choose the type of password you are adding. Choices are API token, Password, and Personal Access Token (PAT).
If you are using Jira Cloud, you must choose API token.
For Jira on-premises, you can choose Password or Personal Access Token (PAT).
Validate certificate: Check this to validate your server's HTTPS/TLS certificate when you click Save and continue to move to the next step. Leave this box unchecked if you do not have a hostname to verify the HTTPS/TLS certificate against.
In the Select Jira project tab, choose the project where issues will be created and synced with Aha! Roadmaps records.
Select a Jira Project to link with your Aha! workspace. The Project you select will populate the field mappings in the next step.
(Optional) Select a Board within your Project. This is useful if want to map to the Jira Sprint field.
Click Save and continue once done.
Once you select a project, you should not rename your project key in Jira. The integration may continue to work, but certain functionality such as the ability to Reload configuration on the Mappings step of the integration will break.
Configure mappings
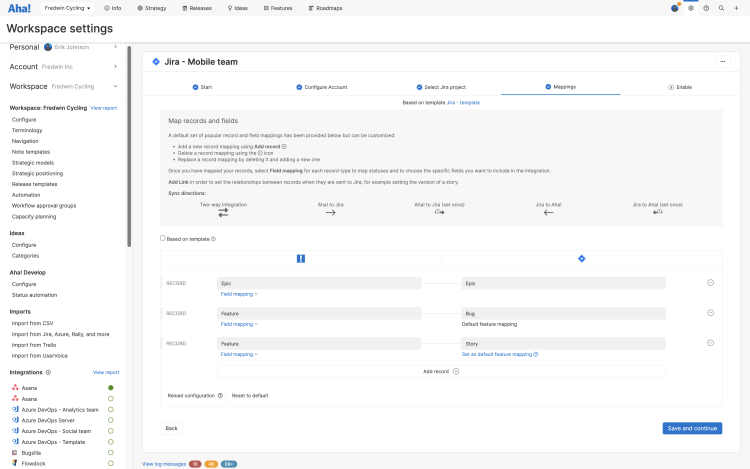
In the Mappings tab, you can configure how records are mapped in Aha! Roadmaps to records in your Jira project. The default mappings are based on what is most widely used by our customers:
Epic <- Epic
Feature <- Story
Requirement <- Sub-task
Release <- Version
You can remove the default mappings and add your own based on what makes sense for your team and how you work.
If you want to configure detailed record type mappings now, check out our recommendations!
For each record mapping, you can also specify your field mappings. This allows you to completely configure how each field within the record is mapped between Aha! Roadmaps and Jira — as well as what relationship links exist for those records.
If you have configured required fields in Jira, we recommend setting the Required flag on those fields in the custom layout associated with your workspace. This will ensure that any required fields are populated when records are created on the Aha! Roadmaps record creation form.
You can bi-directionally map the Jira status with resolution field to the Aha! status field. This allows you to show an issue's status (e.g. Closed) as well as its resolution (e.g. Won't Fix).
2.0 integrations with Jira can also map record relationships. Read this article to find out how.
The relationship links are important to understand because they determine the ability to communicate relationships between records to and from Jira. Without these links, records sent between systems will not have an appropriate association with one another. These links are automatically applied by default and should only be a concern if you replace record mappings altogether.

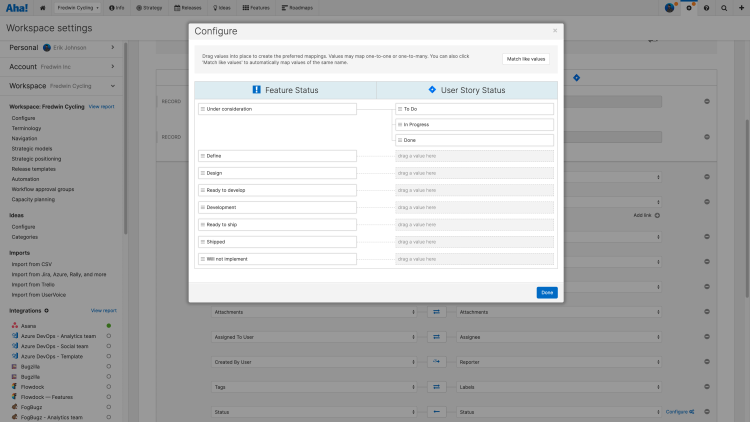
While not every organization needs to customize their field mapping, you do need to define the way statuses are mapped.
For each record, click the Field mapping link below the first field.
Locate the Status field at the bottom of the section, and then click the Configure ⚙️ icon.
In the Configure modal, matching values are automatically mapped initially, and then you can manually rearrange statuses to your preferred mappings as needed. Values may map one-to-one or one-to-many.

Click Save and continue to save your mappings.
Enable the integration
In this section, we will configure how you want data to flow between Aha! Roadmaps and Jira. To do this, you will need a Jira webhook.
This is a critical step in the integration configuration as it allows the integration to function in a two-way capacity.

In the Enable tab, copy the webhook URL from the Webhook URL field.
Webhook URL: Click the box to Enable webhook.
Paste in a Jira webhook. If you do not have a webhook handy, read below or follow the instructions in the modal to create one in Jira. Note: Each Jira integration's webhook runs as a particular Aha! user. That user needs to have permissions in your Atlassian account. You can only import parts of your Jira backlog that your integration has access to, as defined by the Username you used in the Configure Account step of the integration builder.
(Optional) JQL query: You probably want your webhook to pull in only the data that is relevant to your Aha! workspace. If you want help with that query, click Generate recommended JQL query, then paste the result into the Issue related events section of your Jira webhook configuration.
While every integration you configure contains a unique webhook, only one webhook is needed for most configurations. This is because the Jira webhook exists at a system level and, as such, a single webhook can communicate account-wide changes back to Aha! Roadmaps.To learn more about webhooks, see How Aha! Roadmaps webhooks work for Jira Integrations (1.0 and 2.0).
Open Jira, navigate to the administration section on the System tab, and then choose Webhooks. A Jira administrator user is required to log into Jira.
Create a new webhook in Jira, and then paste in the webhook URL that you copied from Aha! Roadmaps.
Select all of the following checkboxes: Issue, Version, Worklog, and Comment events.
Save the webhook.
Finally, decide how you want to send and receive data through this integration.
To specify how updates from Aha! Roadmaps are sent to your development system, select an option in the Automatic sending section:
Approve outgoing changes: Allows teams that are new to the integration to validate what is being sent to their development system and prevent unintentional changes from going through. We recommend this option until the team is familiar with how the integration works, at which point, you can switch to automatic sending.
Automatically send outgoing changes: Automatically sends changes to Jira and does not require manual approval.
To specify how updates from Jira are sent to Aha! Roadmaps, select an option in the Automatic import section:
Approve new records before importing: Records will not be imported until they are approved. Navigate to Settings ⚙️ Integration updates to review those integration changes.
Automatically import new records: Records will be imported automatically to Aha! Roadmaps from Jira. This applies to records which are created as child records of previously linked initiatives, releases, epics, and features.
If a feature's parent release is not linked with Aha! Roadmaps, or if releases are not mapped with the development system at all, then the feature will be imported into the first parking lot release. This is by design, since the parking lots are repositories for unscheduled work.
Add additional security
2.0 integrations have the option to include a client certificate for added integration security. This can also be called mutual TLS (mTLS).
To set a client certificate, open your integration settings and click the More options icon in the upper right, then click Set client certificate. From here, enter the private key and certificate — we recommend creating a private key and client certificate specifically for this purpose — and click Save to save your changes.
If you use an integration template to manage multiple integrations in the same workspace, set the client certificate in your integration template. That way, you only need to set the client certificate once.
This feature will only provide additional security when the server that Aha! Roadmaps is communicating with validates the certificate. This is usually only possible with customer-configured on-premises integrations. Client certificate authentication is in addition to the standard username and password/token authentication and is not a replacement.
Test the integration
Congratulations! You're ready to test your new integration. To do this, send a feature to Jira by following these steps:
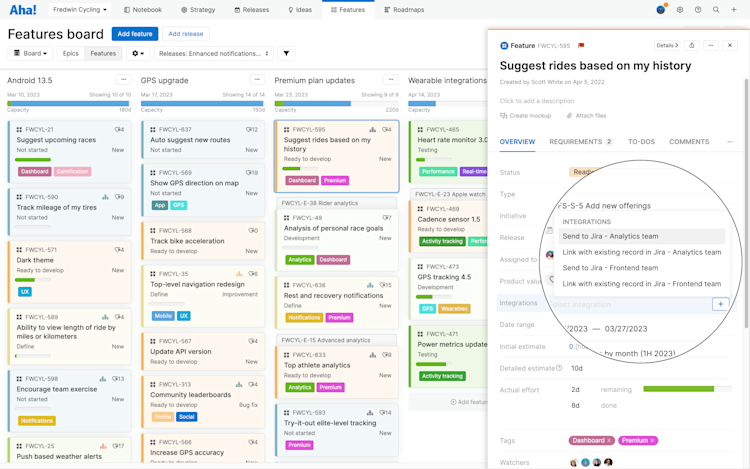
Navigate to Features Board.
Click on a feature card, scroll to the Integrations section, then select Send to Jira. A link to the Jira record should display in the Aha! Roadmaps feature after a few seconds. You can click on it to make sure that everything was sent to Jira correctly.
You also have the ability of manually bulk sending a subset of features to Jira.

Data deletion
Now that records are flowing between Aha! Roadmaps and Jira, let's talk about what happens when you delete a record in either tool.
If you delete a record in Aha! Roadmaps, it will not delete the record in Jira. Likewise, if you delete a record in Jira, it will not delete the record in Aha! Roadmaps. This is intentional, so that one team cannot delete another team's work.
Manage your integration
If you have multiple Jira integrations that you need to manage, use the Manage integrations report, located in:
Settings ⚙️ Account Integrations for account-level integrations.
Settings ⚙️ Workspace Integrations for workspace-level integrations.
If you run into difficulties with your Jira integration, start with the integration logs. Next, review answers to common problems in the Jira and Jira troubleshooting sections of the knowledge base.
If you get stuck, please reach out to our Customer Success team. Our team is made up entirely of product experts and responds fast.