Explore  

User story mapping: Practical templates and examples

Last updated: October 2024

User story mapping is a visual exercise that helps product managers and development teams define the work that will create the most delightful user experience. It can help you gain a deeper understanding of your customers and guide the team to better prioritize work. Software leader Jeff Patton is often credited with developing and sharing extensive knowledge around user story mapping.

In user story mapping, you create a dynamic outline of a representative user’s interactions with the product, evaluate which steps have the most benefit for the user, and prioritize what should be built next. The focus is on desired customer outcomes instead of solely on development output or feature specifications. For agile organizations, user story mapping provides an alternative to building a flat list of backlog items or working from lengthy requirements documents.

Get the whiteboard template — with a free trial.

User story map large


User story mapping employs the concept of user stories — which communicate requirements from the perspective of user value — to validate and build shared understanding of the steps to create a product users love. You want to write user stories in a format that captures business value and can be completed within a development iteration (usually called a sprint).

The user story format — As a [type of user], I want to [action] so that [benefit]. — encourages you to think about product interactions from a user’s perspective.

In this guide, we break down the process of creating a user story map into six steps. These steps are not prescriptive — use them to help you adopt a new user story mapping process or improve an existing one.

If you use Aha! software, you can take advantage of built-in user story mapping functionality in a couple of ways. Dynamic user story mapping is built into the features section of Aha! Roadmaps. You can also get started quickly with the user story map template, or visit this guide for even more template options: User story templates + user story mapping templates.

Use the following links to jump ahead to a specific section:

What are the benefits of user story mapping?

Mapping user stories can make it easier for you to build experiences your customers love. When done well, user story mapping helps you:

  • Focus on user value: When you build a user story map, you are envisioning the product from a user’s perspective. The resulting story map helps you identify how users experience the product and what efforts will lead to the best outcomes. This forces an outside-in approach to product roadmap planning.

  • Prioritize the right work: Building a holistic visualization of all the work necessary to deliver a Complete Product Experience (CPE) can help product managers decide what is most important, organize work into releases (the delivery of a new customer experience), and de-prioritize work that has less user value.

  • Drive clear, well-sized requirements: User story mapping can help you write stronger users stories by providing a visual representation of how large items of work break down into smaller ones, and by illustrating how work items fit together.

  • Deliver new value early and often: User story mapping helps you group your work into iterations and releases based on how valuable it will be to users. Working on the most important things first means you can deliver the most customer value faster, get early feedback from customers, and learn quickly what product features will be most valuable.

  • Expose risks and dependencies Creating a story map of how users interact with a product can give you a global view of the product so you can visualize potential blocks, risks, and dependencies that must be mitigated in order to deliver the product successfully.

  • Build team consensus: The process of conceiving and building a user story map provides a shared view of the customer experience and the work that is required to improve it. The exercise encourages conversations that lead to a shared understanding of what to build, when, and why.

Related:

Top

Who should participate in user story mapping?

User story mapping is a collaborative exercise that helps align cross-functional teams around building a product that will be better tomorrow than it is today. For this reason, product managers should involve anyone whose work contributes to delivering greater customer value.

Since a user story map requires a holistic view of the product, it is helpful to collaborate with team members who contribute to the CPE. This includes folks from:

Related:
Top

6 steps to create a user story map

User story mapping starts with a decision about what medium to use for building the story map. It can be done with simple physical resources — such as a wall or whiteboard and sticky notes — or with digital tools. (If you use Aha! software, you can use our whiteboard template or build one within the Features menu of Aha! Roadmaps.) Regardless of the medium, the following steps can give you a solid framework for creating a user story map.

Step 1: Frame the problem

What is the problem your product solves for customers? What job does it help them do? Taking a goal-first approach is critical in mapping the work that follows, and you need to ensure you are mapping the customer’s goal. This is true even if you are building enhancements to an existing product. Employ this classic user story format: As a [type of user], I want to [action] so that [benefit]. It will help you think about product interactions from a user’s perspective.

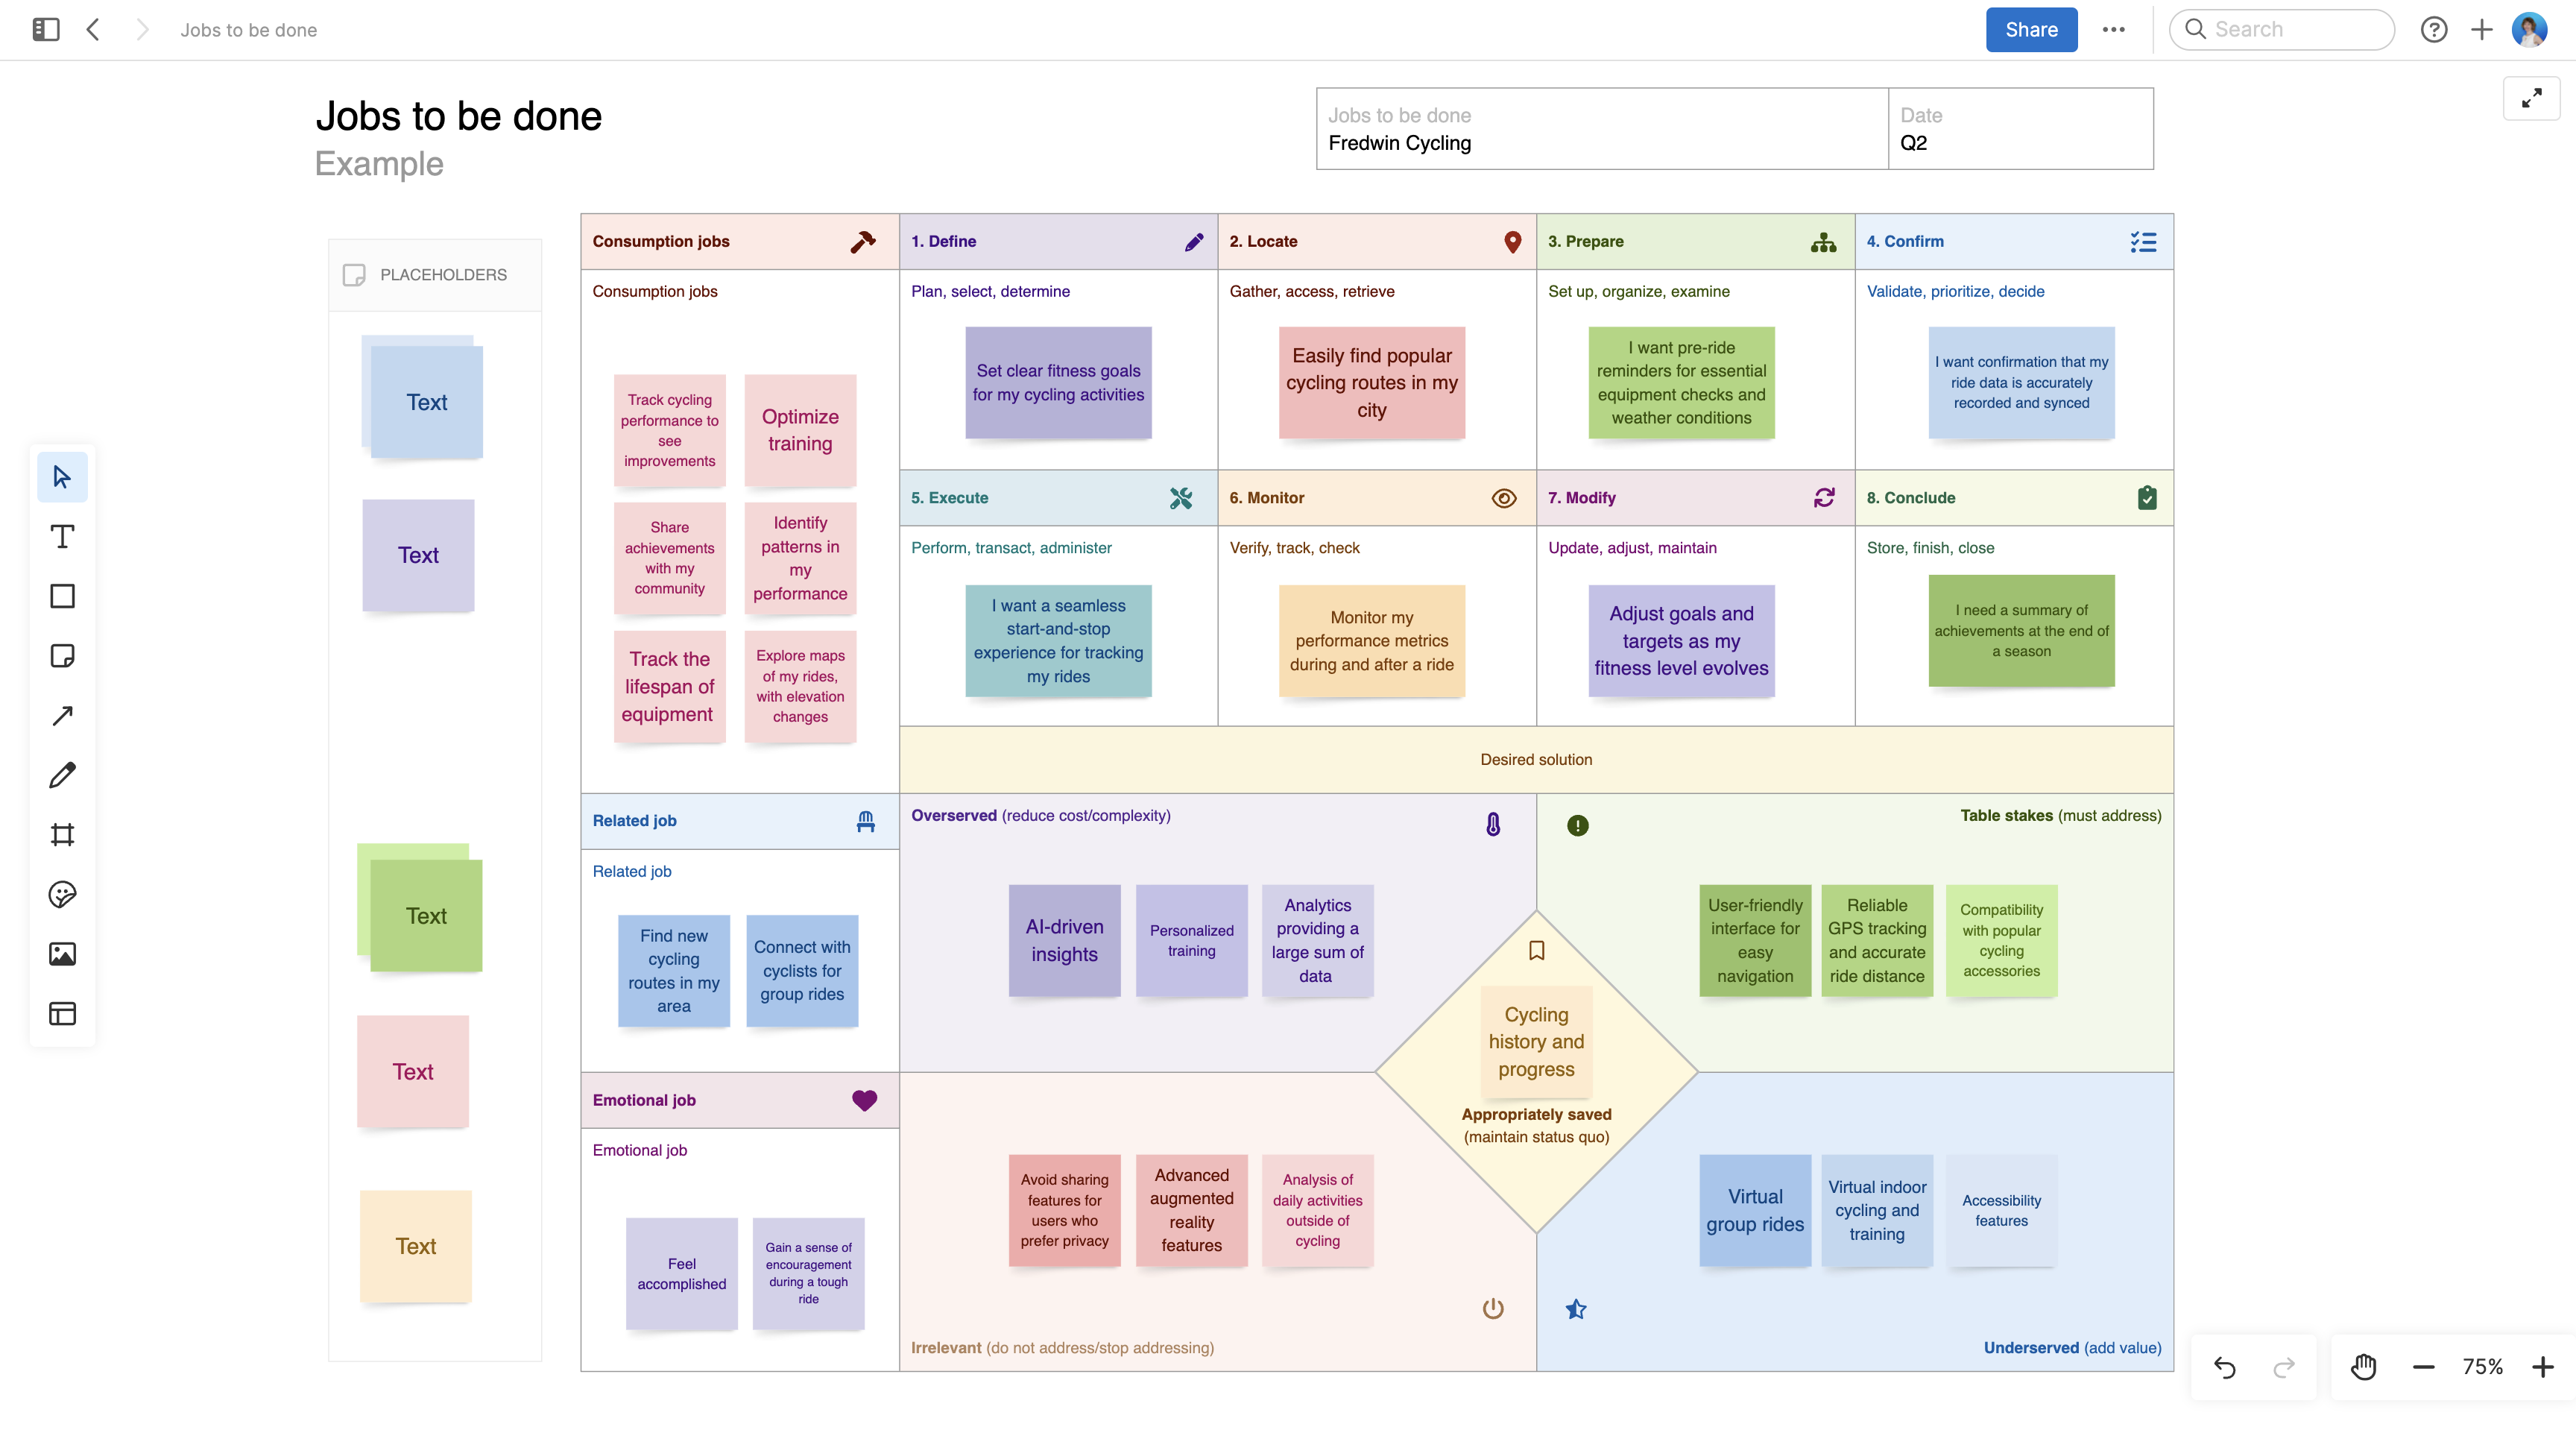
Example: This jobs-to-be-done template frames the functional job users are "hiring" your product to do — in this case, tracking daily workouts in a mobile app. Use this template to help you complete step one.

Jobs to be done large

Step 2: Understand the product’s users

Who is the target user for your product? There is likely more than one. Different audiences can have different goals and ways of interacting with your product. Create a set of user personas so everyone understands who makes up the target audience. Then build stories from that point of view. This eliminates wasted effort on edge cases that are not a fit with your target audience.

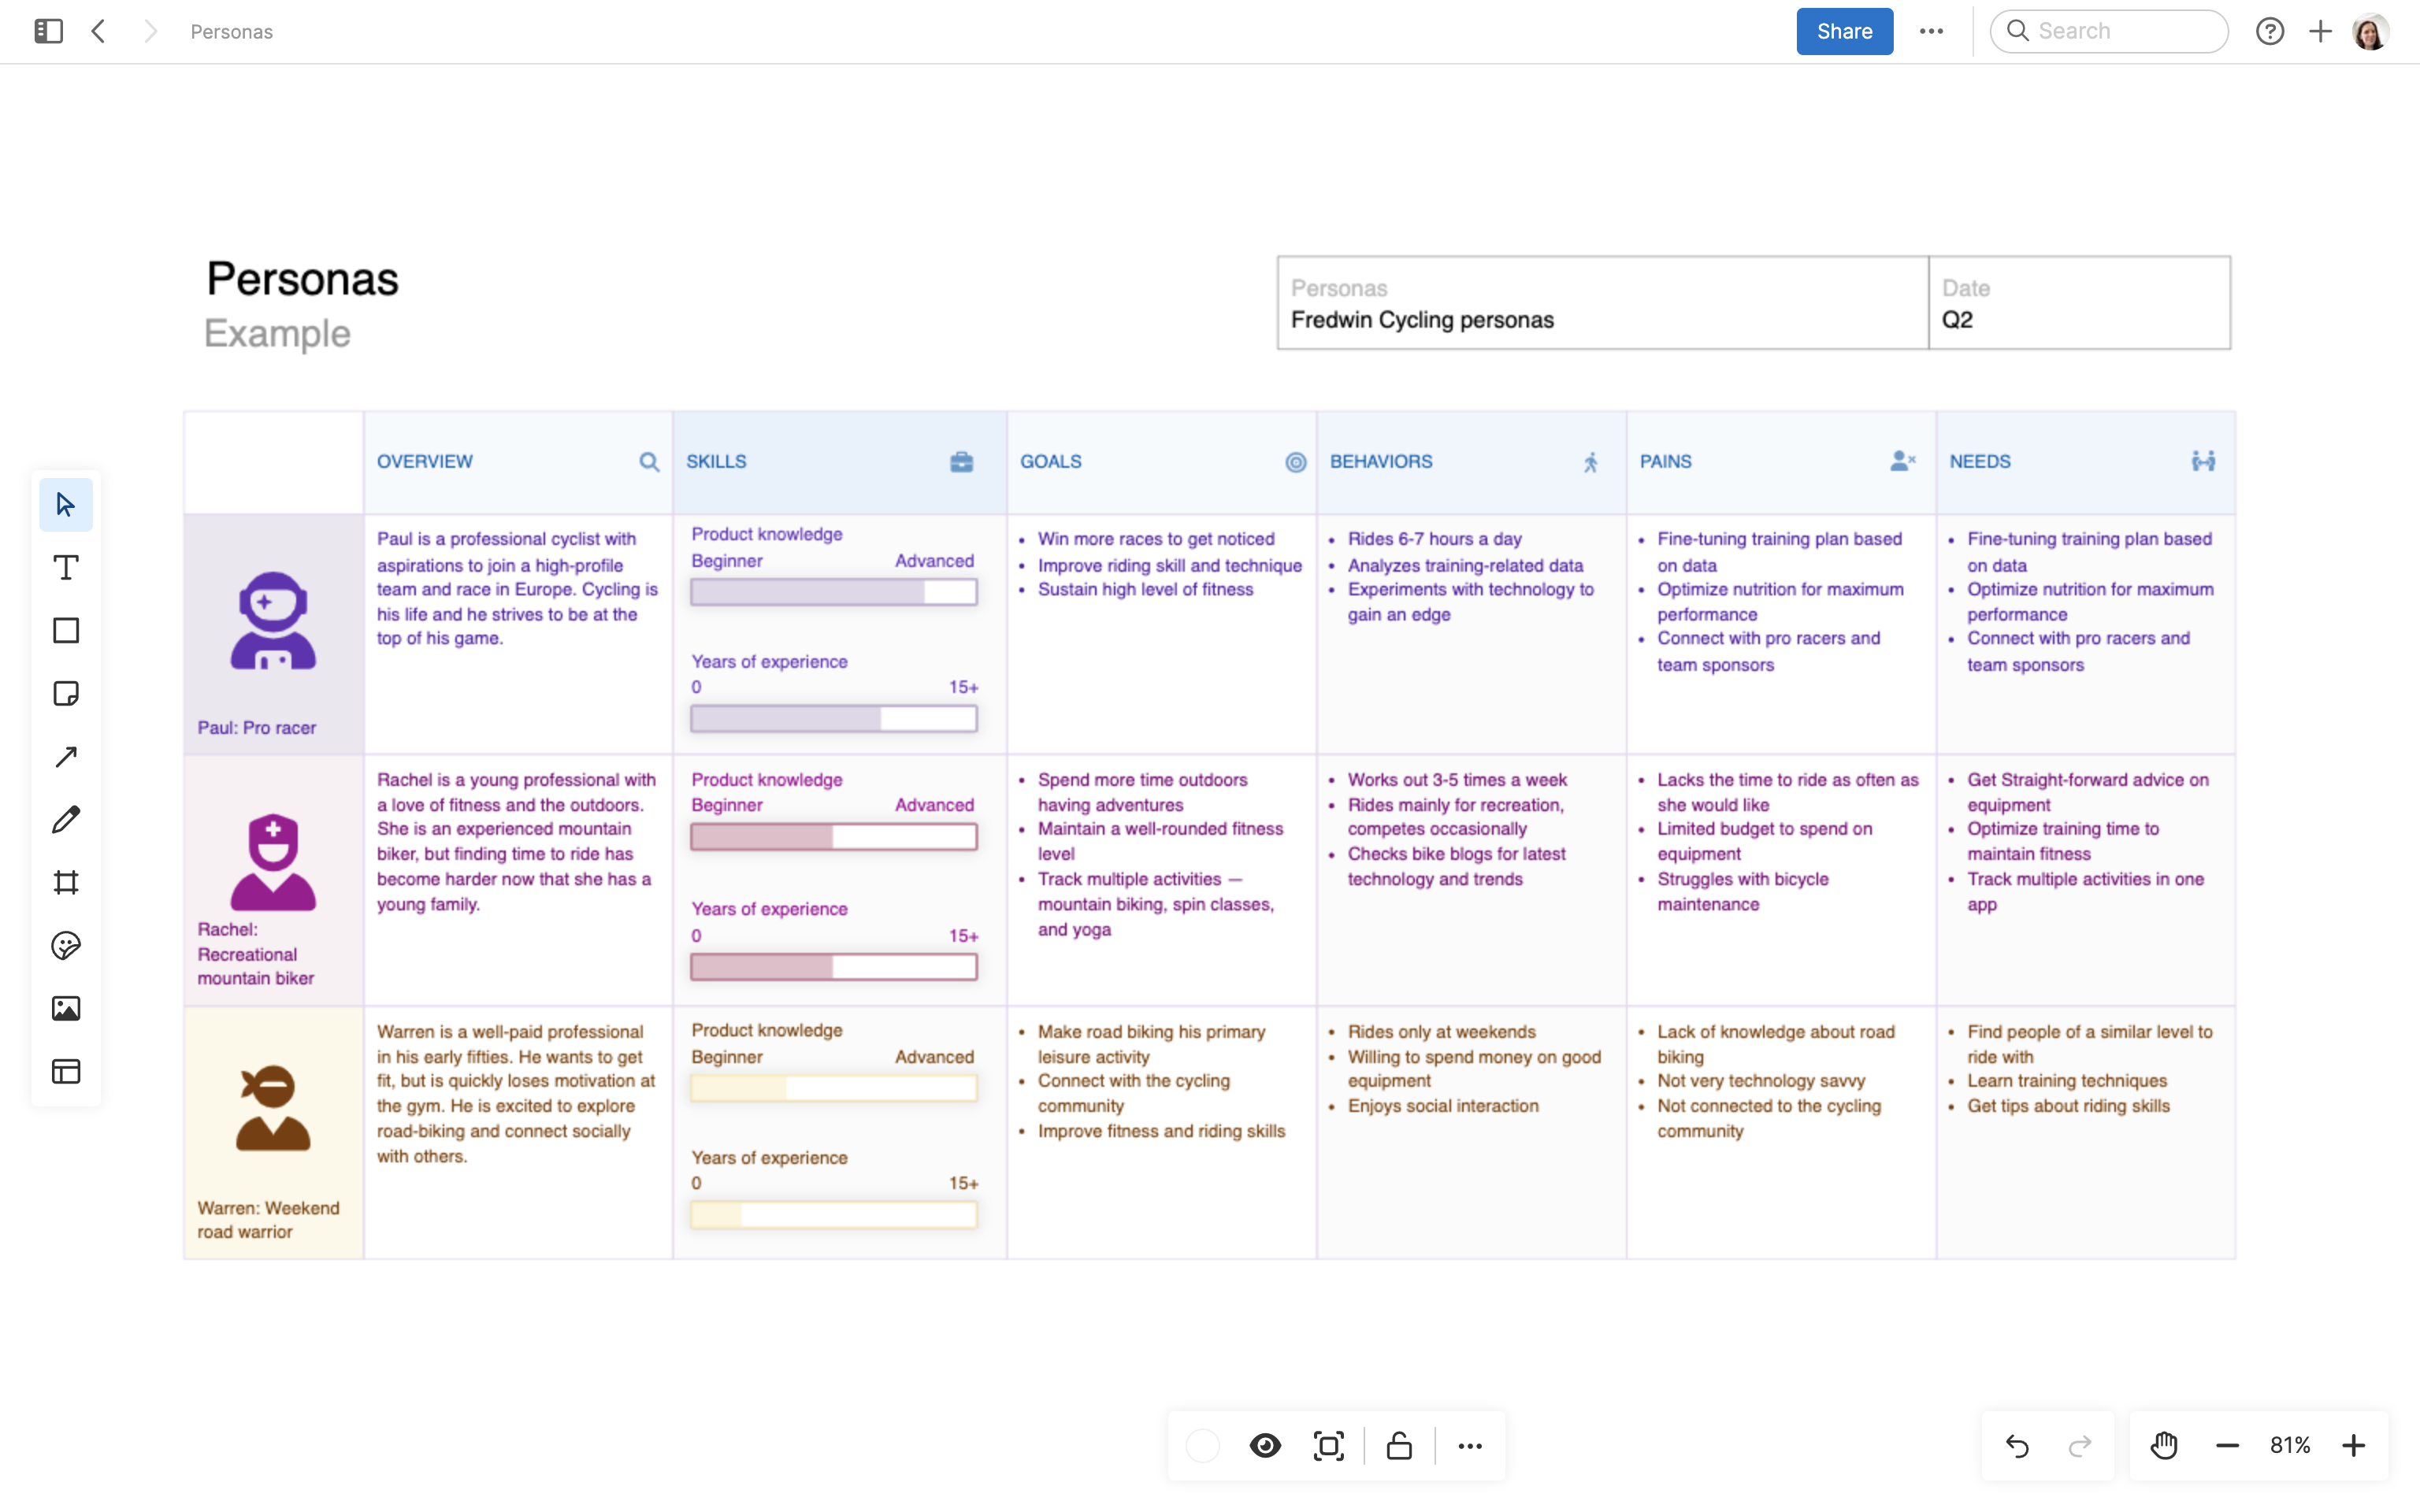
Example: This template defines three different target fitness app users based on what we know about their skills, goals, behaviors, pains, and needs. Use this personas template to help you complete step two.

Personas large

Step 3: Map user activities, then user stories underneath

All users who interact with a product will likely do so through a series of common activities. These activities — also referred to as themes or functions — form the backbone of the user story map. They make up the stories across the top of the map.

With the backbone in place and major themes defined, you can now break down each activity or theme into smaller epics and user stories.

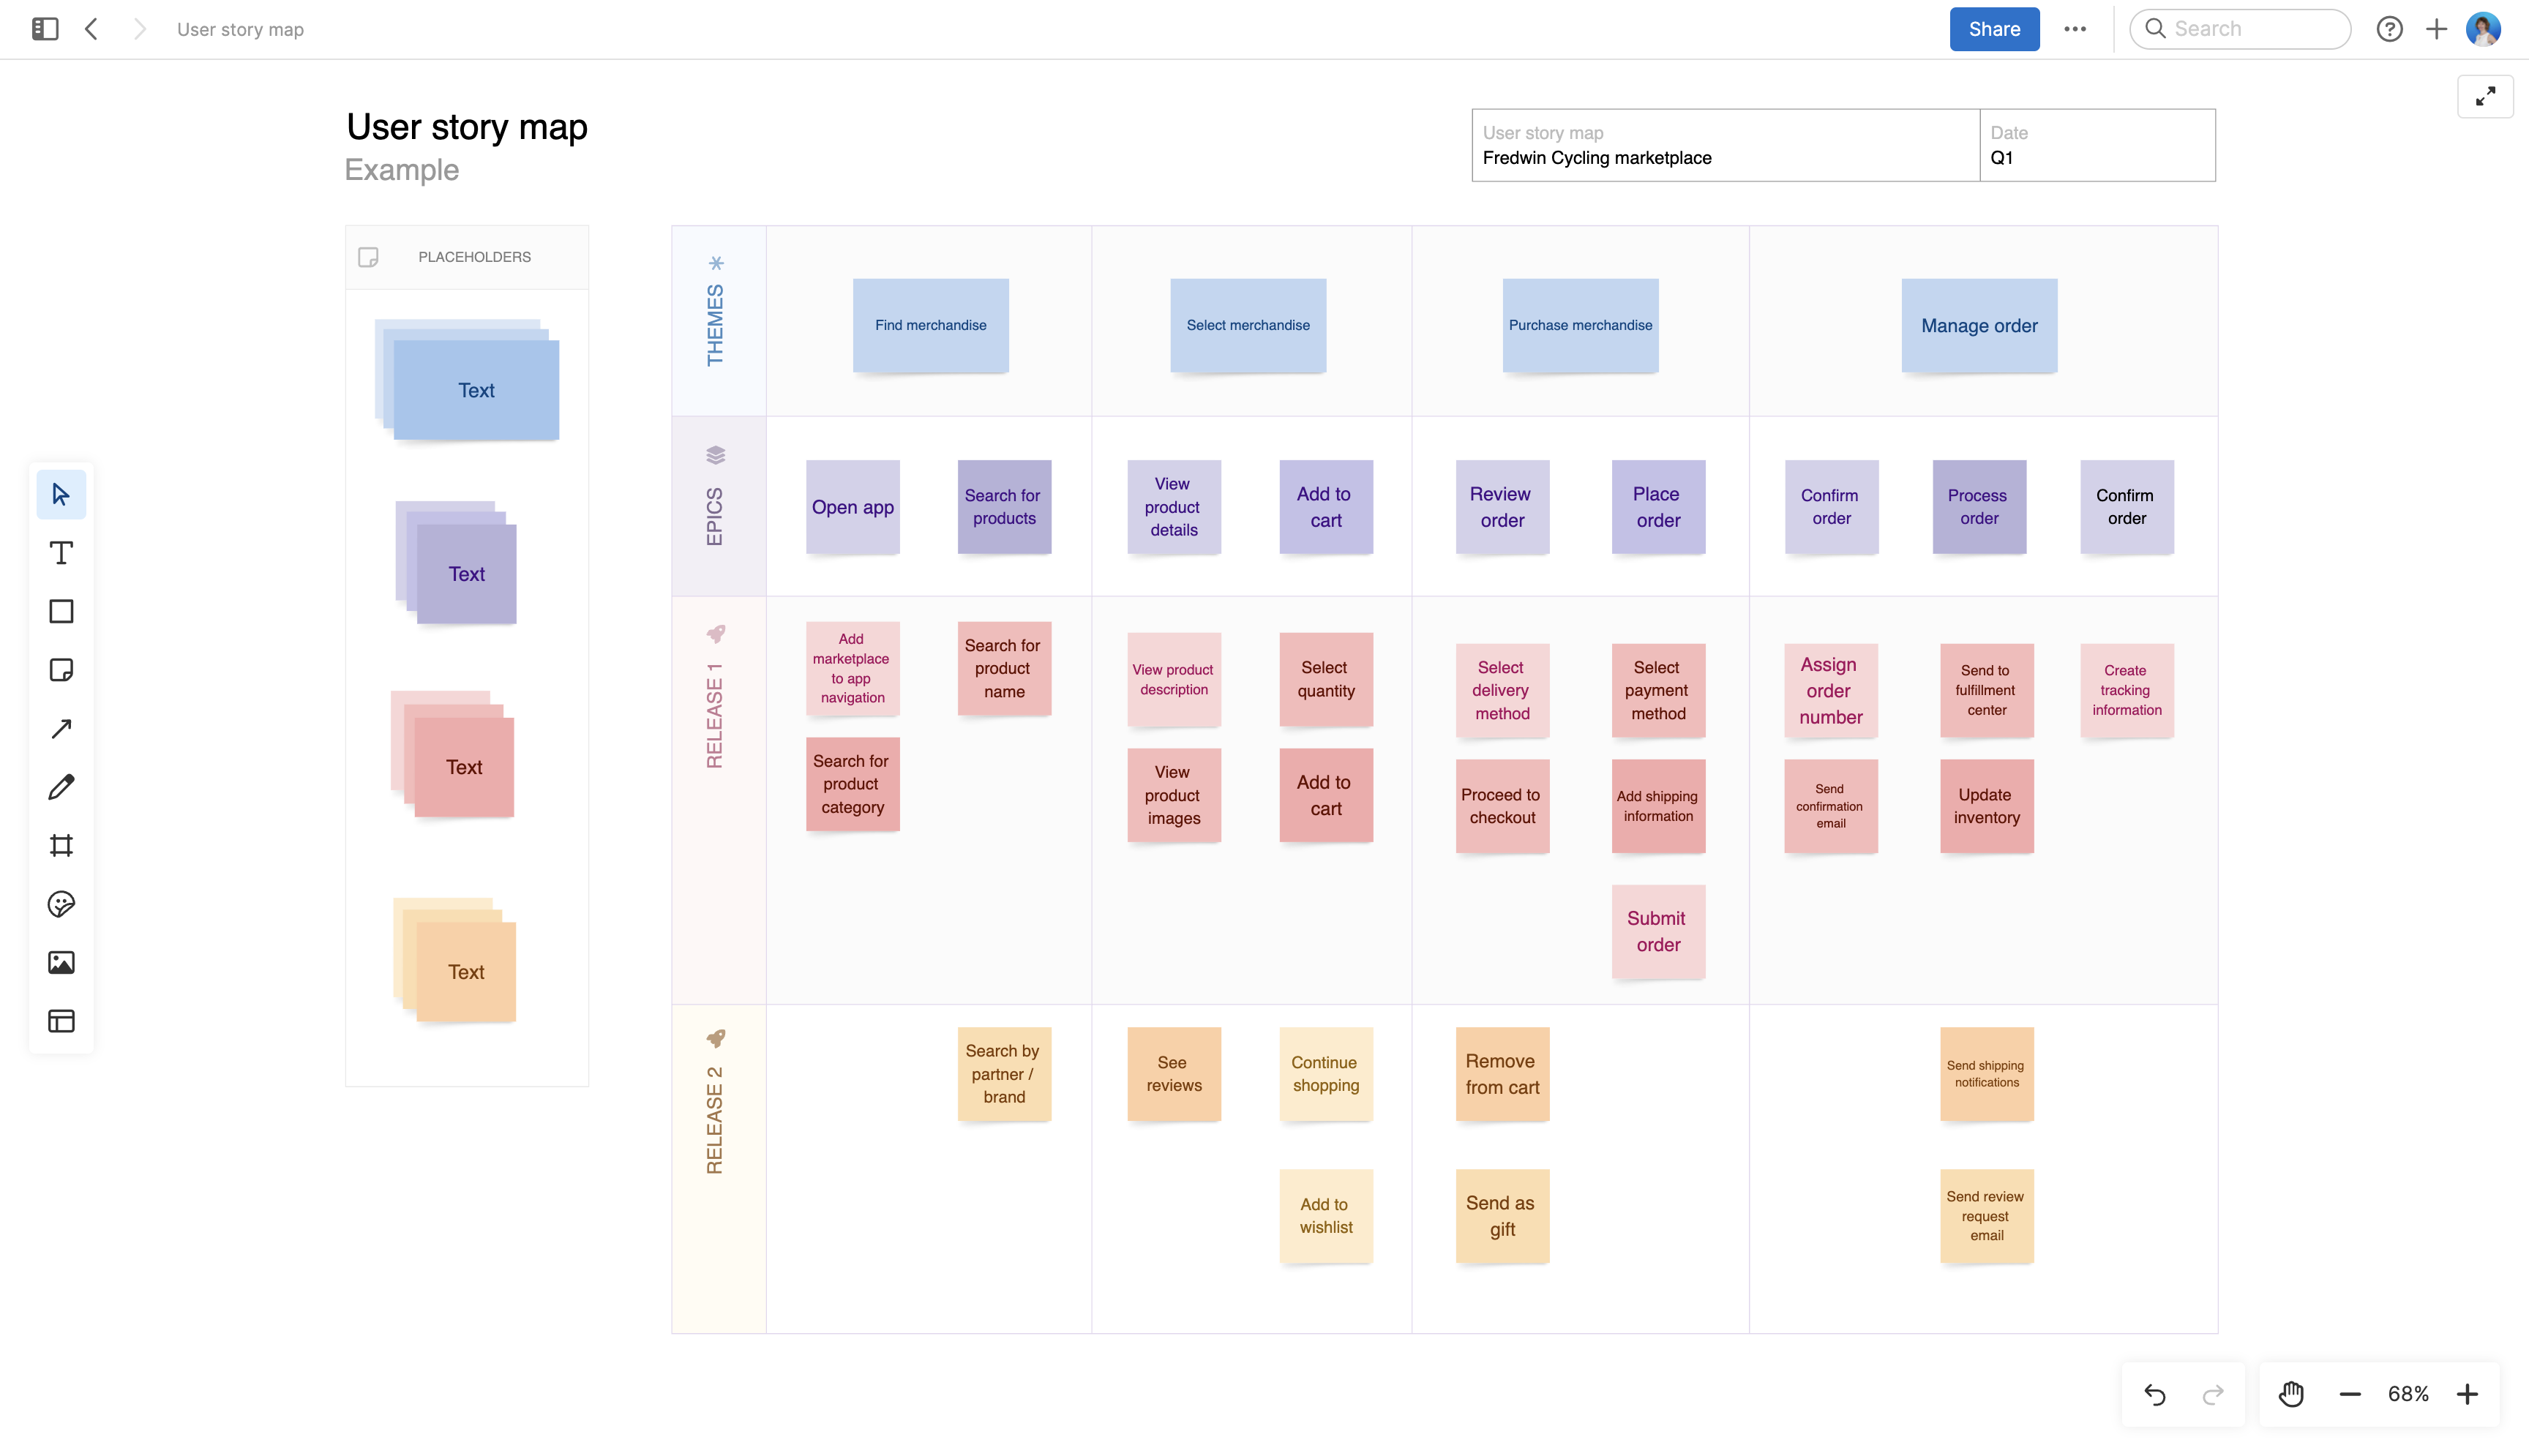
Example: The backbone themes across the top represent what the user ultimately wants to do, laid out in logical order. Below that are epics and user stories — which help to organize and break down more specific user actions within each theme.

Use this user story map template to help you with step three, then continue with it through the remaining steps to complete your user story map.

User story map large

Step 4: Flow and prioritize

With the high-level themes and detailed user stories in place, a good next step is to prioritize stories, ranking them vertically (like you see in the image above) so that the most important ones are at the top. Then, map how users flow through the product — typically from left to right. If you have multiple personas in the second step (like our example), you may want to map different scenarios for each. Stacking stories like this will help you decide which stories are vital and which ones are less important to delivering a delightful product experience to the target audience(s).

Step 5: Identify gaps, dependencies, technical requirements, and alternatives

The story map gives you the ability to envision, upfront, the potential issues that may slow you down later, such as bottlenecks, dependencies, requirements, or missing information and capabilities. Identifying these details before design or development work begins can help you enhance usability and better meet user needs.

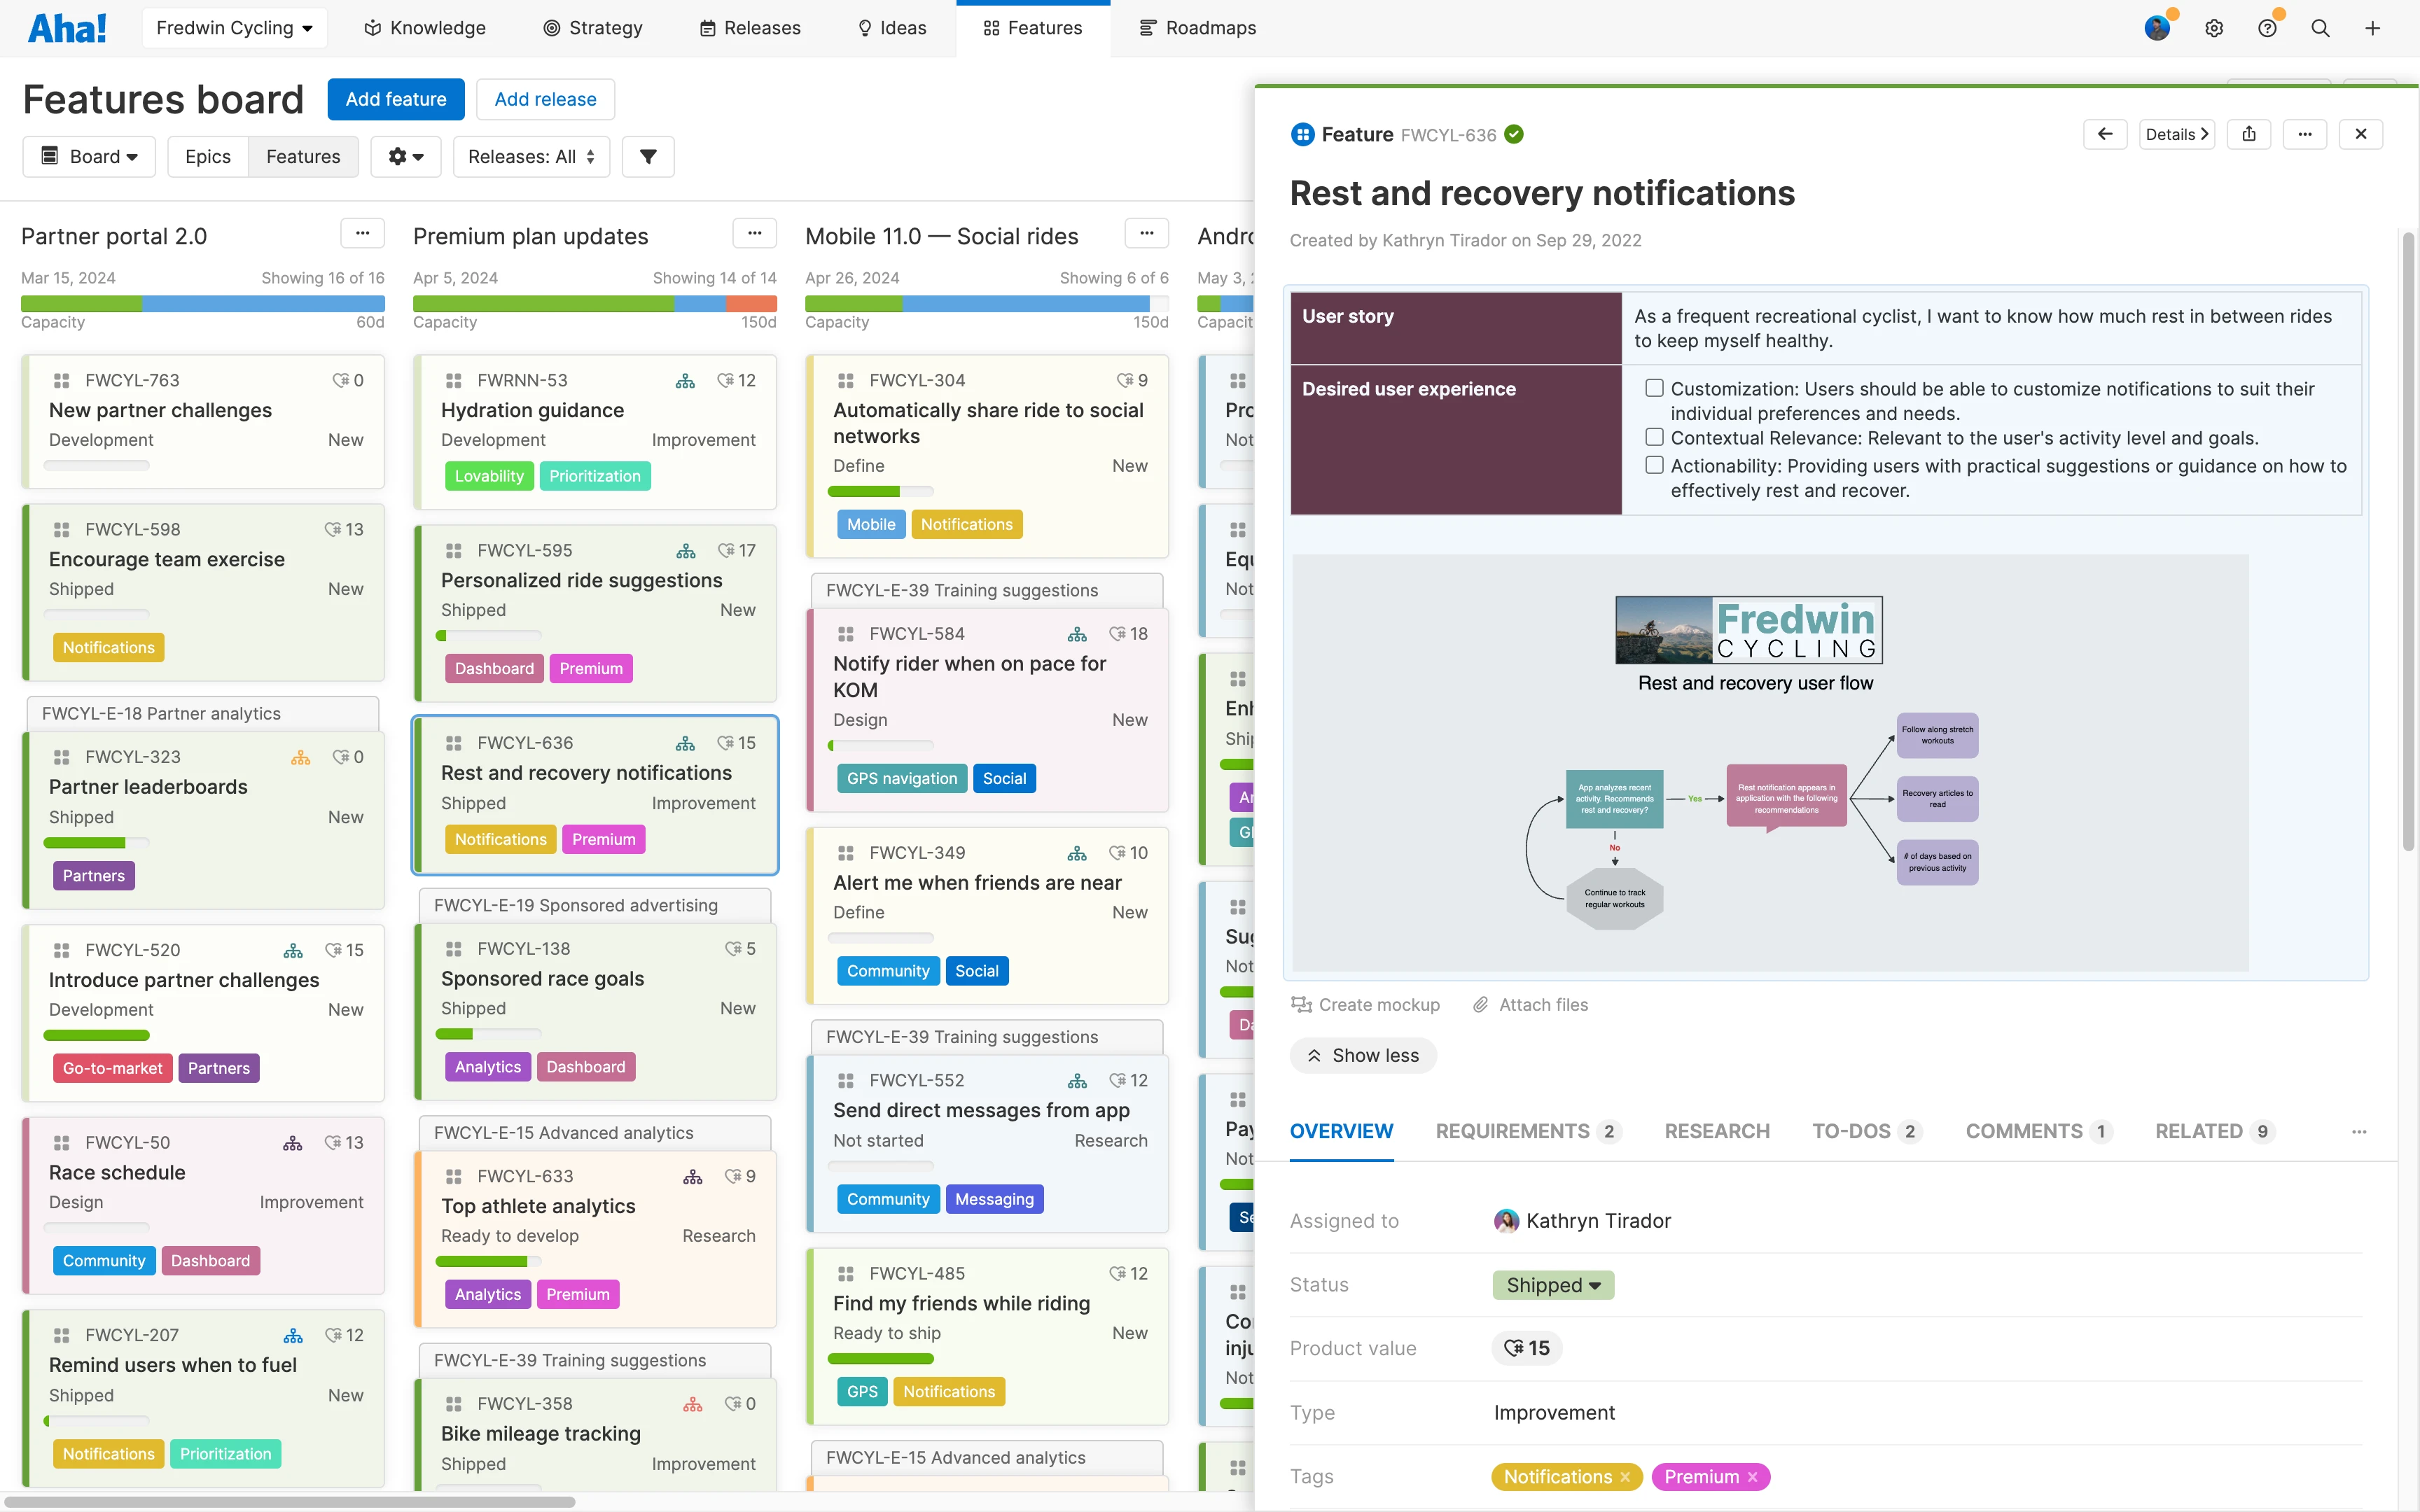
Example: What you identify during this step can be added to and tracked within related feature work like the user story and requirements in this example.

Features board with drawer open in front of it and whiteboard embedded in a feature description.

Step 6: Plan sprints and releases

Next, turn this visual exercise into real work. With stories prioritized from the top down like you see in the example above, you can picture the work that will deliver the most value in the shortest time and group stories into development sprints and product releases.

Create horizontal “slices” across the map, grouping stories by priority within each critical user activity. Note: this is not about identifying what is required for a minimum viable product; rather, it is critical for identifying the most important work to be completed to create a delightful customer experience.

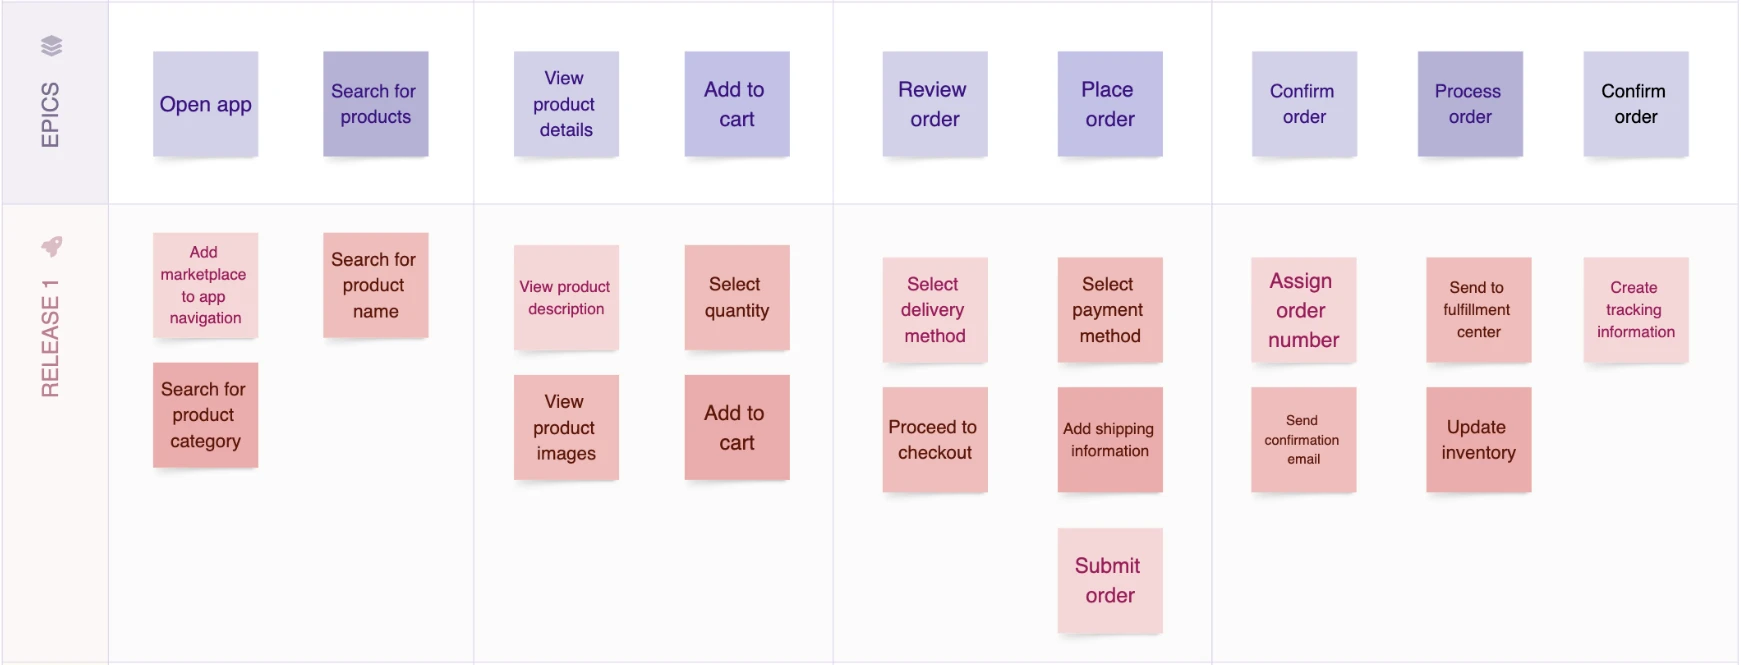
Example: Zooming in on the user story map example from above, you can see that the first release indicates top priority user stories for each epic. (For example, see "Add marketplace to app navigation" and "Search for product category" under the "Open app" epic.)

User Story Map - Zoomed to epics and releases

Top

What are some challenges of user story mapping?

User story mapping can be beneficial for product managers who want to move fast and build offerings customers love, but it can also yield disappointing results if you face any of the following challenges:

  • No clear customer: If you do not know who the customer is, then it is impossible to work out how they experience the product. You must know for whom you are mapping stories.

  • No clear problem: If you do not know what problem your product is solving for customers, the entire exercise of user story mapping can backfire. Building out stories towards the wrong customer goal can result in a waste of time and resources — not just in the exercise itself, but also for the sprints and releases that are based on it.

  • Limited utility: Physical story maps made from sticky notes on a whiteboard are difficult to keep updated. The notes stop being sticky and fall off, whiteboards get cleaned and the work is lost, or iterations and releases get shipped without updates to the board. Additionally, story maps built in a single, physical location do not serve teams in other locations who cannot see them. This is why virtual whiteboarding is the choice for many teams.

  • Re-work and redundancy: Stories from a user story map typically need to be recreated in a flat backlog afterwards, such as a software development tool, in order for engineering teams to begin working on them. As a result, this exercise can make these folks feel that they are doing the same work twice. However, if you use Aha! software, the user stories on your user story map are connected to the real work that they represent.

Related:

Top

What happens after user story mapping is completed?

With your story map built, it is time to schedule your prioritized stories into sprints and releases. You may want to share or review the user story map with teams that did not participate, including leadership, to ensure everyone agrees on the product roadmap. Anyone contributing work to the upcoming sprint or release who was not represented in the mapping exercise will need to add their work in as well.

Here are a few more tips for putting your user story map into play:

  • Transfer user story mapping artifacts into a shared tool. Engineering may need to add technical specifications and acceptance criteria to ensure all the work delivers the user value identified in the story mapping exercise.

  • Keep iterating. Your user story map should not be static. Update it with findings from research spikes, revised estimations, and user feedback. The story map can also be used as a visual roadmap to communicate both the planned work and work that remains.

  • Take advantage of each exercise as an opportunity to get closer to customers and increase your levels of empathy for what the customer is trying to accomplish. Story mapping is a tool to help create customer value with an incremental, iterative approach, and it presents opportunities to learn and improve as you go.

FAQs about user story mapping

What is the difference between a feature and a user story?

Features are units of work — representing what you will build to deliver on your product vision and provide value to customers. A well-defined feature describes how functionality will work, support your strategy, and benefit users. User stories also describe product functionality, but unlike features, are captured in one or two sentences and written from the user point of view. They summarize specific ways users will interact with your product and highlight tangible benefits they will receive.

What are some tips for writing good user stories?

In the voice of your users, answer questions like: "What are my pain points? What do I want to gain from using this product? What would make this experience better?" This can help you get into the right mindset for writing user stories.

Then, craft succinct user stories with the help of this simple formula: As a [type of user], I want to [action] so that [benefit]. Avoid using technical language — instead think about how your users would describe what they are trying to do. This will help you articulate their needs quickly and clearly.

How do you prioritize user stories in agile development?

Consider the criticality and urgency of each user story, as well as how much effort each will take. This will require product management and engineering teams to work together to determine what is achievable based on capacity and the velocity of prior sprints. Push any user stories that cannot be completed next to the following sprint. Ultimately, prioritizing user stories is about planning the most impactful work within the time that you have.